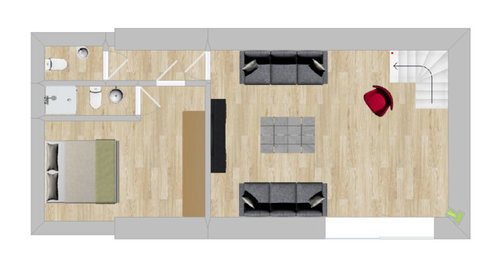
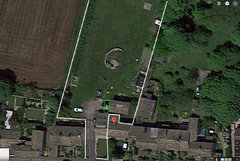
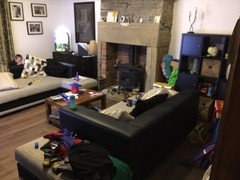
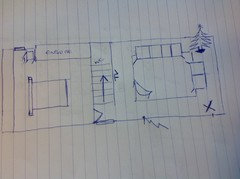
Home layout dilema after plans approved for extension into barn
Alex
6 years ago
last modified: 6 years ago


Featured Answer
Sort by:Oldest
Comments (28)
 PRO
PROHeat Architecture London
6 years ago
Jonathan
6 years agoRelated Discussions
POLL: Conservatory or extension?
Comments (192)If you were our client, we would first assess which way the house faces in order to understand the direction of the sun and the likely impact on the space in terms of light and heat, plus we would ask what use you intend to place on the new space. It is also the case that with whatever heating - a fully glazed conservatory can seem an inhospitable space in the winter months. Even in the UK heat gain during our short summer is a major consideration and whilst roof blinds can be added - these can spoil the original design intent. A part solid / part glazed roof with fully glazed walls may be the most successful. Attached image of a garden room with a large strategically placed roof light and two fully glazed walls....See MoreSingle storey side extension layout
Comments (17)Are you aware that building a 'L' shape extension will need planning permission first, this will set you back another 3-4 months. Plus Building Regs would need reapplying for. Also, from my experience conservatories only need building regs approval if they are over 30sqm; which means most conservatories are shoddy built and the foundations are unlikely to be suitable for the transformation into a proper extension. Also, the floor is unlikely to have been insulated - sorry but conservatories can be a hornets nest of problems. My advice is yes you should have a door off the hallway into the new room, cost of that should be minimal as you are only looking at using a couple of standard concrete lintels which are cheap as chips! Although I would have put the shower room at the front as the current layout means friends and visitors end up going through your kitchen to use the convenience. It has the advantage the new reception room as a rear garden outlook. Hope that helps...See MoreAdvice needed - kitchen and living layout w extension, mid-terrace
Comments (18)Been thinking about this one overnight:- ( i have a sad life! all say ahh ) You do not have to have a window to call it a habitable room, however, I believe there is a building control requirement for the room to be vented through another, check that out. So, in short, yes the bedroom could be moved and not have 'windows' . I don't know the arrangement of the wall top left that goes in to the garden area, but bear with me. ............ would it be better to have a separate Galley kitchen? I would prefer so. Is there a possibility of a window far top left? A stud wall only takes up 4" so not a great deal of space, plus it would make the lounge / diner look a lot nicer without seeing the kitchen on view permanently & of course you get a longer kitchen run. ( I think the proposed one is too small ). Plus you gain a wall to the lounge area, always handy for furniture placement, as this is what is lost in an open plan arrangement. I also changed the bathrooms round as previously suggested, and had the entrance in the hallway for the second one. Please bear in mind as a said before:- Not to scale - don't have dimensions as had to guess, but on the face of it, likely do'able. I like running plans through estate agents...........ones that I know well and trust as I know they'll give me their honest opinion on what would infinitely give a better price on re-sale. Contained living and dining with separate kitchens, good sized bedrooms etc. So do ask one. Estate agents are handy, they will want you to get more for the property because, if they smell a sale, they get more commission! Roughly where i was going with this after some sleep!Of course, if you still want to go open plan with the living / dining/ kitchen, then lose the top wall and maybe consider a door system to open and close for entertaining purposes - No doors, fully open plan .with doors!...See MoreHelp with ground floor layout please...... playroom, snug or study?
Comments (19)We did love some of the suggestions above… but stuck with our original plan! Although we did change the kitchen layout from U-shaped to ”farmhouse” style, with the table in the middle and sink under the window overlooking the garden. The old dining room has become an office with two desks - partly due to COVID and the need to work from home and homeschool etc! We have also moved a lot of the children’s toy storage in here although they still bring things into the main lounge to play where there’s more room. At 8 and 5, they also actually now keep and play with a lot of toys in their rooms, so I think the old dining room will remain as more of a computer and homework room - it’s nice being able to shut the door! The ”study” on the plan is very much a workshop/gym/play room for my husband! We didnt want to sacrifice that space. It might turn into a teenage den later on perhaps, or even a downstairs bedroom for my Nan. The small upstairs bedroom has become a second office as I’m also still working from home (and my husband has too many meetings downstairs!). It houses our sofa bed too so acts as a spare room and my space to do yoga and sewing. Overall, we are pleased with how everything turned out. We quite like the option to have space away from each other and the flexibility to change the use of the different rooms. We do all spend a lot time together in either the kitchen or main lounge as plenty of space in both....See More PRO
PROOnePlan
6 years agoAlex
6 years agolast modified: 6 years agoAlex
6 years agolast modified: 6 years ago PRO
PROXAMI Architecture & Design
6 years agoAlex
6 years agolast modified: 6 years agotemple274
6 years agoAlex
6 years ago- PRO
XAMI Architecture & Design
6 years ago - PRO
Heat Architecture London
6 years ago Alex
6 years agolast modified: 6 years ago- PRO
Heat Architecture London
6 years ago minnie101
6 years agoAlex
6 years agolast modified: 6 years agoAlex
6 years agolast modified: 6 years agoAlex
6 years agolast modified: 6 years ago- PRO
Heat Architecture London
6 years ago Alex
6 years agominnie101
6 years agoAlex
6 years agolast modified: 6 years agoAlex
6 years agominnie101
6 years agolast modified: 6 years agoAlex
6 years agomordzy73
6 years agominnie101
6 years agomordzy73
6 years ago


PWJ Architects Ltd