tim_summers15

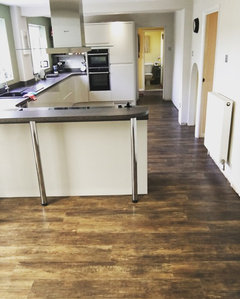
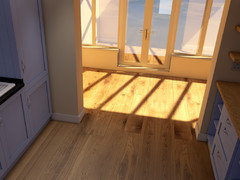
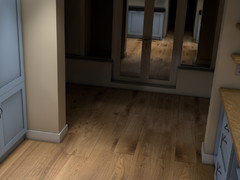
It’s go, Go ....... GO !!! – Kitchen / Diner project.

Tim Summers
7 years ago

Firstly I wasn’t sure if this should go into the ‘before/after’
area of the forum – because I intend to include a lot of ‘during’ in this
thread.

So, this is the first major project that we’re
undertaking in our new house. Yes we’ve
splashed some paint around the rooms, got new furniture etc., but this is the
first ‘biggie’.

We’re changing out the separate kitchen and dining
room, into a kitchen/diner – so this involves:

  1. Removal of the whole old kitchen

  2. Removal of the internal separating wall

  3. Electrics / Plumbing

  4. The making good

  5. Decorating – Tiling, New floors
    etc.

So, as a picture is worth a thousand words I’ll
start with pics (my intention is to try and take the photos from roughly the
same spot so it’s easy to see the changes)

Before (left hand side)


Before (right hand side)


Before (panoramic)


After (left hand side)


After (right hand side)

After (panoramic)

For this first ‘phase’ I’ll only concentrate on photographing the kitchen bits. Once the wall is down
then I may go for another picture taking place.

On Monday the builders are coming in to remove the wall (the left hand side) - and remove the weird chimney thing where the cooker was (and do a little bit of plumbing). They're also removing a wall mounted electrical 'radiator'. Tuesday is the Electricians day - chase new wires all around for appliances, put in additional sockets, light switches, replace the mains fuse box, carry the spotlights through into the dining room and all other electrical stuff. Wednesday it's the plasterers turn to skim the both rooms so it's an empty shell ready for the kitchen fitters to start the following week.

There's no turning back now !!!

Comments (81)

  • Tim Summers
    Original Author
    7 years ago
    last modified: 7 years ago

    So, penultimate day today - a few more dramas, but nothing that we couldn't sort out. The legs for the breakfast bar were way to short !! A quick look online, and a 2 hour round trip to some random homebase somewhere in the middle of nowhere that had some in stock (typically all the local ones didn't have any in stock) and we were back on track. The kitchen fitter ordered them, I just voulenteered to pick them up so that he could carry on working - plus I got to blag the afternoon out of the office and 'work from home'.

    The ovens have now been installed:

    Top one is a gril / top-oven / microwave combo and the one underneath is a standard oven (slide'n'hide of course)

    You can also see from these pics that he's done the upstands as well. I personally love the look of them (we'll then be tiling a few rows of metro tiles above)

    And he also did the breakfast bar

    The breakfast bar isn't really going to be used by us adults too much, it's mainly put the kids onto stools it'll scare them still :) I suspect that it'll mainly be a serving shelf, or even just a simple beer shelf for when my mates come over - you never know - but IMO it looks bloody lovely.

    Also, we wanted it duel level so that it makes the hob harder to touch from the stools.

    Tomorrow the front of the dishwasher will be fitted, and sillicon sealing around all the upstands etc. That may be about it - oh, and the kickboards. I've been told to go around the kitchen tonight and pick 'faults' (or things that I'm not 100% happy with) so that tomorrow PM he can go through my list.

  • Jonathan
    7 years ago
    In my opinion adding tiles is unnecessary and a wipeable matt paint will give a cleaner look.
    Otherwise looking great.
    Tim Summers thanked Jonathan
  • Related Discussions

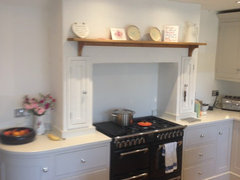
    kitchen in a geogian house - what style should I go for?

    Q

    Comments (8)
    Personally I'd go for a shaker. I've got a black aga which I love the masculine look of and it creates a focal point but if you don't like yours then get rid, I don't think it's a prerequisite for a period home. Agree with Jonathan re working around the features. I've copied a link to a Georgian kitchen on houzz. Also have a look at images of DeVol kitchens, they are often in period homes and often use dark contemporary colours which bring a shaker kitchen right up to date. However having said that you can mix contemporary with period features. What's the style of the rest of the house? https://www.houzz.co.uk/magazine/kitchen-of-the-week-a-dublin-revamp-thats-tall-dark-and-handsome-stsetivw-vs~65619143
    ...See More

    Urgent help please. Kitchen island & flooring going in tomorrow

    Q

    Comments (1)
    you've done it basically right, whether you need the 2 internal support panels really depends on the worktop you're having as you could possibly get away with not using them. if you do use the 2 support panels, you'll have to reduce their depth so they're in line with the panels at the end, i'd also cut out a square at the bottom of the 2 support panels so the plinth can run through in one piece instead of 3 bits, i'd also make some 600-602mm strips to go between each panel at the front/top and use a pocket drill jig (google pocket drill jig) to fix so the panels are all fixed together (these would be stepped back 20mm so the door can close) and it gives you something to fix the appliances to. i'd also fit the doors before getting to far as integrated fridges are awkward doors to fit and line up as when the door opens it can catch on the panels at the side and to adjust the door you may need to adjust the legs. the final look should be all the edges of the 4 panels should be flush with the front of the 3 doors. the other thing i can see in the picture is you've put a couple of brackets to fix the end panels to the floor and you'll see them as they wont be behind the plinth. good luck
    ...See More

    Kitchen diner layout advice-where does the dining table go?

    Q

    Comments (3)
    I would have the table against the wall (opposite window) with either a bench of built in seating, this way you could have space for a chair / sofa on the opposite aide. If you used a bench, you could then put the table centrally for occasions (xmas etc). I think a central feature light would still work with wall lights to table area.
    ...See More

    HELP!! How to lay out our new kitchen. I am going mad!

    Q

    Comments (15)
    Hi Ben, As we get into the nitty gritty details with measurements and everything, then that starts to really get into a checking everything, very time-consuming situation to make sure all the elements of your project will fit and work out. I am retired now, but may I suggest once we get the big stuff laid out, then you (if you feel confident) or get a professional to check over the entire plan to make sure everything works for the measurements, spaces, appliances you are looking at, etc. A kitchen designer may help, but would really try to find someone who can 'consult' on the whole plan. That way you know everything checks out when it comes time to do the buiding works & installation. If you have a kitchen designer as well, usually part of the kitchen sales package, they can then double check all of the kitchen & utility stuff. What I can do is tell you in functional terms what I know will work better for layout given your building constraints, day-to-day living, etc. First, I like the row of tall cabinets along the left side - this will allow for optimum storage - even a coat closet in the first cabinet if there isn't enough space in the entry. Plus for all the dishwear you may not use everyday but are helpful for extra guests, and for the option of sticking in a built-in microwave & coffee maker, if not another better place. So if you can keep this, then great. If not, then it can be configured partially or wholly like your standard kitchen units. Plan 1 - this plan depends on how you want to use the island and the dimensions of it (if it is big enough). Sink ideal in island really. The sink doesn't have to be centered, but there needs to be at least 30cm on the smaller side of it min as you don't want dishes falling off - 50-60cm is ideal of course. Dishwasher - If you are left handed, put your dishwasher just right of the sink and if you are right handed, put it just left of the sink. Range on other side of utility door Fridge as is Plan 2 - Island clear Sink other side of utility door Sink placement makes dishwasher placement tricky - if enough space then to right of sink Range on right side wall Fridge as is Plan 3 - Island clear Sink on right side wall (if plumbing is doable) Dishwasher - If you are left handed, put your dishwasher just right of the sink and if you are right handed, put it just left of the sink. Range on other side of utility door Fridge as is Plan 4 - Built-in coffee / microwave station in tall cabinet where Rridge is shown now Sink ideal in island really. The sink doesn't have to be centered, but there needs to be at least 30cm on the smaller side of it min as you don't want dishes falling off - 50-60cm is ideal of course. Dishwasher - If you are left handed, put your dishwasher just right of the sink and if you are right handed, put it just left of the sink. Range on other side of utility door Fridge at the end of the cabinetry on the right wall All of these layout plans give you a useable and functional working zone (usually triangle shaped for sink - range - fridge) that isn't too spread out to become a neusance. Also, they each aford you a viable counter prep space or two for chopping and preparing your meals. Your partner may think you are mad, but that is why people hire designers - because most plans need to be worked and reworked, taking in to account loads of factors, preferences, and incorporating great design as well as dealing with copius measurements. This is why hours and hours can and often should be spent on getting things right in the planning. I can't tell you the number of houses I've visited where people have had work done that just didn't function well for them in the end. It is worth it to spend the time over it now and if you need to - hire help or get a professional to double-check you work. It usually saves money and hopefully loads of frustration down the road. Best wishes and Good Luck!
    ...See More
  • PRO
    Oasys Property Solutions
    7 years ago

    Something similar to [this[(https://www.houzz.co.uk/photos/renovation-contemporary-kitchen-austin-phvw-vp~93427), but constructed from the same material as either the worktop (provided can be double sided) or end panel. Alternatively, brackets similar to these.

    Tim Summers thanked Oasys Property Solutions
  • Daisy England
    7 years ago
    Interesting reading. I too am in the process of a kitchen refurb. Messy job!

    One thing I would say is that the flooring should have been laid before the units and appliances were fitted. You wouldn't have had the height problem you are now experiencing and if you have tiles fitted after the kitchen and appliances have been fitted how do you plan to get any broken down appliances out? They'll have a step to get up and a worktop on top.

    Beside having my own kitchen done we also supply and fit bespoke joinery and kitchens and would always fit the floor before the carcases.

    Don't put tiles over the upstand. The idea of the upstand is to keep it streamlined and modern, but by adding wall tiles you're taking it back in time. Upstands alone are fine.

    Finally, the kitchen look great. Well done to you all.

    Finally,mother kitchen looks lovely.
  • Daisy England
    7 years ago
    Always fit the floor before the units. That way if you have a problem with appliances you can get them out. Run the tiles under where any appliances are to be fitted. You'll struggle to get appliances out for repair if you have a tiled step and a worktop over the top.

    Looks great.

    Looking good.
  • Tim Summers
    Original Author
    7 years ago

    Loving those brackets! I would have gone for those if I'd see those before - in retrospect there are a few minor changes that I could make if I'm being super picky, still love the kitchen though.

    What I'll do is see what the kitchen goes like with those legs for the time being - the kitchen fitters boot prints are still in the dust on the floor, so it seems a bit too soon to be changing things :) I'll get the flooring in and see what how that looks and live with everything for a while before making any changes.

    One thing that I have done this morning is order a couple of peices of heat resistant glass (one clear and one black) to fit on the upstand directly behind the hob. After taking my time to go around it yesterday I'm a little concerned that the rear ring is a bit too close to the upstand itself, and I think that over time we could encounter some scorching etc. I know that it's not a gas hob, but there must be some residual heat coming from that area when you're boiling spuds or something else for a length of time. Luckily it's only a small ring so I guess that it'll be mainly used for a pot of beans or something quick. May as well spend a few £'s on some glass now rather than have to replace the lot in a few years.

    The Mrs isn't too keen on the idea - hence both the black and the clear - at least it gives her the impression that she's making the decision :)

    Lets see what happens with that one.

    These are the pics that I took when the fitter left yesterday, the only visual change would be that the kickboards have been fitted:

    Electricians are coming tomorrow to connect up all the appliences, fit the sockets, change the lightswitches, and change the spots into LED's

  • xtine74
    7 years ago

    Just read this all in a one-er ! Fab to see the progress unfold, especially as i have a similar project about to start in the next couple of weeks so great to see what i'm letting myself in for !

    Tim Summers thanked xtine74
  • Tim Summers
    Original Author
    7 years ago
    last modified: 7 years ago

    Right, not really been all that much happening recently. I've made some new window sills and fitted those, and the walls have been undercoated.

    I've also painted the kitchen ceiling from 'tobacco stained light yellow' to brilliant white - that took the best part of the weekend to do - was an absolute nightmare, but 3 coats (BY BRUSH!) later, I'm really pleased with it now.

    We've been out looking at floorings - we've got the fella coming out on Thursday to measure and quote. We've gone for Amtico, and I think that the colour/name is something like rustic barn oak. It'll be interesting to see what sort of price we can get on that.

    Over the weekend we started painting the walls. They've only got one coat on at the moment, but I think that we've chosen well IMO.

    Ceiling in progress - standard white.

    end wall, and wall to the left has had one coat of F&B skimming stone

    other end wall - and boxed in RSJ and water pipes - one coat of F&B skimming stone

    The remaining wall - the one with the two windows on, and conservatory - will have F&B Lichen. This is a nice close match to most of the ever-greens in the garden so will (hopefully bring the outside in) and also because green changes depth perception, 'should' move that wall out a bit as it's a narrow room.

    I was tempted to paint the RSJ in this lichen, and bring it down the Skimming Stone wall on the other side - but I think that may just be a bit too funky. We'll see what it looks like once everything is done. I tried the RSJ in white to match the ceiling but that just looked boring - so went Skimming Stone.

    Will update again once things have progressed more.

  • Tim Summers
    Original Author
    7 years ago
    last modified: 7 years ago

    I managed to get one coat of paint on the 'garden' wall. This was taken last night, and this morning it looks a really lovely colour. I'm looking forward to getting home and putting another coat on tonight. Then Thursday, putting a second coat on the rest (and touching up with a small brush all the mistakes).

    A couple of questions though:

    1. What would you do with the inside bits of the windows (I don't know what they're called)? At the moment I've just left them, but wasn't sure if to paint them green like the walls, or brilliant white like the sills & windows. I suppose that white would reflect more light in. What do people generally do?

    2) I'm still not convinced about what colour to do the pipe boxing in. You can see that I've currently done it in the main wall colour - Opinions?

    (pics below have the origional blinds - they'll be getting changed)

    (also the wall sockets have the fronts taken off - they're low profile/screwless brushed chrome so I've whipped the decortative bits off so that I don't accidently get paint on them)


  • Daisy England
    7 years ago
    The window recesses need to be painted green not left white and the same for the boxing in.
    Tim Summers thanked Daisy England
  • Tim Summers
    Original Author
    7 years ago

    Thanks, I've just asked the Mrs to paint the recesses, and she's sent me these. I agree I think that they look better.

    I'm still unsure about the boxing in - I think that I'll give both colours another coat and live with it for a few days before making a final decision.

  • Tim Summers
    Original Author
    7 years ago

    Second coat of green went on last night (pic taken last night) - woke up this morning, looks amazing. So pleased with the colour choice. I also removed the tape from the edges so the joins are perfect. The Mrs is doing the cream today, then I 'think' that we're just about all done with the painting.


  • Daisy England
    7 years ago

    Looks much better with the window recesses green. My kitchen (which we are in the processes of doing, longgg job) also has the boxing in and steel girder similar to yours and I have painted that the same colour as my walls. As the decorator said to me "it's all part of the wall therefore should be the same colour". However mine is light grey and blends in OK with the white ceiling. Are you leaving yours white?


    Reading back through some of your previous posts please don't add tiles above the upstands. Keep it clean and streamlined. Upstands are going on mine too and nothing else.


    Looks great by the way. Full marks to the "Mrs" for excellent handling of the brushes and roller. She sounds like me.

  • Tim Summers
    Original Author
    7 years ago

    Thanks Daisy. Totally agree about the window recesses - looking back at a previous photo (when they were left white) they do look a little odd.

    The boxing in: Mine is actually light grey (F&B skimming stone to be percise) - that's the colour of the other 3 walls. The ceiling is brilliant white, but all the boxing in is all skimming stone. You can see that there is a colour difference between the ceiling the RSJ in the pictures above - it's not a shadow which is could be confused with.

    I'm still going back and forth - but I'm keeping it for a while.

    As for the tiles - they're a defiante no-go !! Don't worry about that. It was an idea - a pretty strong idea - but after looking around this site, and getting advice, then the general consensus was either tiles or upstand, NOT both also I didn't spend 2 days plastering the walls to get them perfectly smooth to cover them up with tiles :)

    And yes, she's a star with the rollers and brushes ! She can even cut in lol. I don't have the patience for all that. I left home at 7:30 this morning and she was already moving the paint out of the utility room getting ready to start the second coat on the grey walls this morning. I'll pop home at lunch to see how she's got on and make her a sandwich or something.

  • Daisy England
    7 years ago

    Bless the Mrs. We are good. I've done all my kitchen too including the ceiling as it had to be replastered and then downlights added. Needless to say I was sooo glad when it was finished. The walls are easier to do.


    I thought it it was a shadow on the RSJ to the ceiling. Downlights seem to have this effect.

  • Tim Summers
    Original Author
    7 years ago
    last modified: 7 years ago

    Right, quick update - all the walls have had 2 coats on them, and all the touching up done. Other general stuff also completed.

    Last night I cut a couple of peices of left over worktop and fitted them as shelves to the wall - pretty pleased with the outcome

    Trying to work out the final height using very technical equipment of some pots of paint and cardboard shelves:

    Finally completed:

    I'll hopefully get the picture up tonight, and the fascias on all of the sockets. Then finally start to get 'stuff' back in the kitchen and out of my man cave.

    Window dressing will be the next - but that's no big deal

    Floor is booked in for 11/12/13 August

    Then, that's it just about done - finally.

  • mrstuartjames
    7 years ago

    Great project Tim

    My kitchen is in progress right now - tiled floors ripped out (including an ancient iron floormat recess), electrics nearly done, plastering almost finished. SO MUCH DUST!!

    Kitchen units being painted as we speak - Little Greene Limestone 238

    Hopefully be fitted by Monday as the templaters are in, then the flooring will get done

    I've really enjoyed your posts mate, well done - now go get a beer and relax


    Tim Summers thanked mrstuartjames
  • PRO
    Bloc Blinds
    7 years ago

    Hi Tim,

    Your kitchen looks fantastic! Great job! I had debated using the F&B Lichen in my kitchen but thought it might be too dark so I chickened out, looking at your pics now I wish I had just gone with it!

    Now you're at the final stage and considering window dressings I'd like to point you in the direction of Bloc Blinds. We have some beautiful plain and patterned prints but what makes them different is the fact that you can change the fabric of your blinds without changing the system if you do decide to redecorate later down the line.

    With your current colour scheme the below fabric, Flower White, would be perfect but if you want to change the pattern or if it just gets worn from kitchen spillages you can just swap it to a different one.

    Congrats on a job well done!

    Kiera


    Tim Summers thanked Bloc Blinds
  • Tim Summers
    Original Author
    7 years ago

    Thanks Kiera. I'll send the link home and have a
    look at them later this evening, I've briefly browsed, looks
    interesting. I'll see what the budget (ha ha, that's a joke of a word on
    this project) allows. To be totally honest we only want something that
    looks good, and covers up the bad cutting-in around the top of the
    window frame - there is no other reason to actually have them. We
    have no-one overlooking our back garden etc. Unless you climb a tree then
    you can't see in, so we don't need them for privacy / black out etc. We
    even spoke last night about not having anything at all. We had rollers
    before - They were permanently set at 3/4 (ish) open and were never
    moved. I suppose the only time they'd actually be used and be closed is
    when we go away on holiday. If I'm being honest, then if I can pick
    up a cheap set of white/light grey/cream ones from Homebase or B&Q (or
    similar) I will go with them as long as they look nice as it's purely aesthetics.

    Side note on the F&B Lichen - its a great colour indeed. We were going to order some F&B Olive, but the Mrs couldn't wait for it to be ordered in to our local F&B shop. I'm so pleased we went with this. I'm not into green personally, but this does look really really nice IMO

  • Tim Summers
    Original Author
    7 years ago

    I put the artwork up last night - ha ha, 'artwork' makes us sound posh. I'll stick with 'picture'.

    I spent some time online finding out the ideal height - centre of the picture 60 inches from the floor etc. I used my technical equipment of random stuff I could find in the garage to see what it looked like:

    Marked all the necessary (luckily one of the hanging screws hit a joist, I wasn't happy hanging it all on the plasterboard.

    With much trepidation, and with quite a few beads of nervous sweat, I picked it up, hung it, then after about 5 minutes of just standing there, holding it ... let go.

    It stayed put !! RESULT

    After a few hours of me periodically poking my head around the door to check if it was still hanging - I deceided that I'd done a good job.

    Forward to later in evening - my son was sitting (i say sitting, more slouching, semi-reclined in an upright chair is some doing), stood up, caught one of his shouders under the frame, and nearly lifed the bloody thing off.

    After my heart rate had gotten back to normal - I decided that it was indeed too low and that I'd be constantly worrying about it. So, moved all of the fixings up 13cms (don't know why I chose 13cms). I've messed up the wall behind, but I'm not planning on moving the picture any time soon.

    I think that now it's a touch too high actually - but it's being held up by 4 peices of chord at the back, across 4 screw horizontally in the wall (I didn't want to take any chances), I think that I may skip the two outside hanging screws to drop the height by a few cms - or hang it using 3 loops of chord, rather than all 4.

    It may not look absolutely perfect - but I'm way more relaxed. I should have gone with a £5,99 HMV poster and a £4.00 IKEA frame rather than an £850 handpainted origional that I'm now constantly worrying about.

  • charlie_bill
    7 years ago

    Looking fantastic Tim. I especially like your corner alcove with shelves - we've recently decided to do same instead of having a cupboard! We are mid way through our build and are living in our loft. I haven't had the energy to post anything yet so am enjoying reading yours especially as you are nearing the end!

  • Tim Summers
    Original Author
    7 years ago
    last modified: 7 years ago

    Not done an update for a few days - mainly because the kitchen is never tidy enough now to take a picture. I think that we're practically done now apart from the floor and skirting boards. I'll do a final pic in a few days.

    As for having a relax and a beer - the chance would be a fine thing :)

    I started on the conservatory yesterday - I'll grout it all up tonight and that's another room done. I wasn't particularly bothered about this 'room' - I don't like it at all - I'm guessing that it'll be gone/changed into an extension in the not so distant future, so it was only a quick job just to freshen it up a bit.


    It did take a bit longer than expected though as my apprentice was sadly lacking in concentration and more interested with playing with the sponge in my bucket

  • Daisy England
    7 years ago

    Apprentices are our future. She looks as though she's doing a grand job.

  • Tim Summers
    Original Author
    7 years ago
    last modified: 7 years ago

    FINALLY, ITS UPDATE TIME

    At the end of last week, and over the weekend
    another major change happened. Yes there’s
    been the odd change over the past month but nothing dramatic.

    We now have a 99% completed floor.

    I’ll update with pictures with a description like
    what I’ve done previously.

    Firstly, all of the old downstairs carpets were
    removed

    Then, the old flooring was removed.

    Next the whole of the downstairs was covered in
    self-leveling latex. We thought that
    this would be a nightmare as it is still a ‘working house’ but actually it
    couldn’t have been easier. We all went
    out for the day :)

    The next morning it was all dry and a perfectly
    flat floor had appeared.

    The floor fitters came back – and touched up the
    odd area, and also sanded the whole area – there was so much prep-work
    involved.

  • Tim Summers
    Original Author
    7 years ago
    last modified: 7 years ago

    Here's a few pics of the 99% completed floor. Skirting-boards should be done this coming weekend, or next week.


  • User
    7 years ago
    That looks fabulous! I've loved reading this thread. Which style karndean did you go with in the end?
  • Tim Summers
    Original Author
    7 years ago
    last modified: 7 years ago

    Thanks, we absolutely love how it's looking now. I must admit that we were only 99% sure of the floor - we were not sure about going dark, but IMO we've definitely made the correct choice. It still needs a good wash over etc, to remove all the fitting marks, but apparently we're getting a 'starter-kit' when they come back to finish. Oh, and obvs we're getting chrome door bars fitted where needed.

    We went for Amtico Spacia Xtra in the end - there was just something with this that the the wife liked more than the Karndean. It's SS5W2651 (aged timber). Large plank size, with texture.

    Glad you like!

  • PRO
    Branwhite Properties Ltd
    7 years ago
    You have done a lovely job there Tim. I would think about changing the radiator to something a little more eye catching such as a vertical feature radiator. You could pick something up for less than £200. It would require a small amount of plumbing to avoid the light switch but would really complete that kitchen. The pics below are of a feature radiator we installed in a renovation project last year. Our plumbers finished the look with chrome pipe work and valves.
    www.branwhiteproperties.com
  • denise7125
    7 years ago
    Wow! What a fab kitchen/ding area you now have. Well worth the time, effort and cost to get such a great family friendly space.
    Tim Summers thanked denise7125
  • proctorlouise71
    7 years ago
    Can I ask where the kitchen is from? It's lovely. Thanks.
  • Tim Summers
    Original Author
    7 years ago

    @Branwhite: Yeah, the rad has definately got to go. That has already been spoken about. I'm loving the one that you've posted above actually. On the plus side, the Mrs definately wants a new one so i'll easily be able to get it past her. We're having a break from it all and booked ourselves a Fri/Sat/Sun break-away this weekend so it'll be a good time to reflect on what we've done, and what else there is to do. Changing the radiators will be high on the list. Thanks for the ideas!

    @Proctorlouise: It's actually from Wren (Linda Barker Handleless Oak Putty Gloss Range)

    Surprising yeah? I wasn't expecting the finished quality to be half as good as it is. When choosing we decided to select 5 companies (2 large warehouse style - Wren, Magnet) and 3 independant local designers.

    After having them all over, and looking at the designs - Wren won it by a mile. They seemed to be the only company that actually listened to what we wanted !

    I spoke for hours with the small independants - and every single one of them wanted to put a bloody island in the middle. Even though we said we didn't want one. I even built an island out of boxes where the plans said and lived with it for a week just to see if I was wrong. That soon got stamped down and booted across the room when I was endlessly walking in to it. Even after that, they insisted that it was a good idea.

    Magnet just came up with a wham/bam/thank-you-mam design - that seemed to take about 10 minutes - standard units, standard design, un-inspiring kitchen, done by un-inspiring designers.

    Wren seemed to be the only company that listened to us. I wanted Curves, I wanted a split-level breakfast bar, I wanted clear walls, the Mrs wanted a wine fridge etc etc. They came back with 4 designs (none with a bloody island) - we picked what bits we liked from each, worked on a final more detailed one - it was just a great process. We spoke about square taps, round taps, tap handles, black sink, stanless steal sinks - literally every detail. The others we're like - yeah, here's a kitchen.


  • PRO
    User
    7 years ago

    Such a shame to read your comments about independent kitchen retailers Tim. Some companies just let themselves down consistently. Every Kitchen retailer should listen to their clients and listen well, as we pride ourselves on doing. Your kitchen does look super - particularly like the paint on the back wall as well.

  • Tim Summers
    Original Author
    7 years ago
    last modified: 7 years ago

    It was so dissapointing with the independant kitchen retailers - I was shocked. I really wanted to go small and local, with a great connection with the company - but it just never materialised. I don't know if we picked top-of-the-range kitchen designers, but when I said that our budget was £30k I would have expected more service. Saying that, maybe I picked ones that couldn't handle such a job.

    I've just quickly looked back through my emails, and found a design. This was AFTER we'd shown them the design that Wren had come up with - that's how much I wanted to go independant (I really wanted to give them a chance) - and they came back with this !!


    Sort of similar as Wren (at least this time it doesn't have an island). But, where's the curves? I asked for curves! Where's the split level b/bar? (we expressed how important this was with little kids so they couldn't stretch over from the stools and touch the hob!), how is this sleek and modern in order to fit with the rest of the house? It's not massively different but it also looks like it was done by a year 11 GCSE design student.

    This was done by a Mr *********. Msc, Bsc, AMBCS. Showroom Manager & Design Consultant - you're having a laugh! Design consultant.

    He seemed more pleased with the fact that he'd "got it coming in at" £15k.

    Still - I've used local builders/plumbers/carpenters so it's made me feel a little better for supporting the independants.

    Thanks for the positive comments though - much apprichiated.

  • proctorlouise71
    7 years ago
    Looks really good quality. Wren have had bad press with service. How was your's?
  • proctorlouise71
    7 years ago
    Post design I mean.
  • mrstuartjames
    7 years ago

    Great job Tim

    We've only got skirts and painting left. Shame about the independants - we used a local company for the kitchen (about £10k with appliances), another for the worktops (about £3k), and another for the flooring (again about £3k) - I ripped the old floor out and did doors and electrics myself to keep costs down. Certainly worked out cheaper than the nationals. Thanks to John Smiths Interiors of Melton Mowbray for all their work - the house seems quiet without Tom doing his stuff!

    Overall we love it - we actually liked the island idea and now have a truly unique kitchen. We can't wait to get it finally finished.

    Loved this thread mate - well done

  • PRO
    Curtis Designs
    7 years ago
    last modified: 7 years ago

    Hi Tim, nice kitchen! Always makes me laugh when I see some of the renders the kitchen companies are proud to show their clients thinking how amazing their 3d looks..... lol

    I try and make it look as real without it taking too much time and developed a quick result, this is so right from the start it looks exactly like the end result. In these pictures above, we were looking at where to put lighting and how much we would need in the conservatory.

    This pic was for handle choice.

    Shame the independents could help you out as i think the ones that do bother really make a personal effort..... well some of us do!

  • Tim Summers
    Original Author
    7 years ago
    last modified: 7 years ago

    @proctorlouise.
    I personally found them absolutely perfect – couldn’t fault them at all.
    I’d also read the reviews so I was a
    little apprehensive. As soon as the
    money had been paid I was pretty regularly in contact with Wren’s head office
    where they kept me updated with things at all times. Then closer to the installation date I was
    passed over to their regional support team, who were also perfect. After the kitchen had been fitted we’d over
    ordered some kick-boards as the measurements were really tight so this was just
    in case the fitter made a mistake. We
    also ordered 2 x venting kits of different types as we were not 100% sure which
    one would work the best. I called them,
    they turned up the next day to collect, then the money was back in our account
    the following morning. I also had a draw
    unit that was supplied ever-so slightly out of square – I told them, and a day
    later a new one turned up, then I was contacted to see if I needed a fitter to
    come an install it for me, or if I wanted to do it myself. It’s been such a smooth process I couldn’t recommend
    them high enough. It seems like they’re
    really got their act together. We’re
    also thinking about having our en-suite in our room re-done and I caught the
    Mrs looking at the Wren Bathrooms the other evening.

    We had 90% of the skirting boards fitted very early Friday
    morning – a local carpenter that gives me the impression that he really knows what
    he’s doing and loves his job. He’s been
    doing since it he was 16 as his Dad is a carpenter, and his grandfather – he poked
    around, asked who we got it from and who fitted it, I told him and he was blown
    away by the quality of it, and thought that a small independent did it.

    @mrstuartjames.
    Cracking kitchen there! Really
    like everything about that – you must be over the moon with it.

    @Curtis Designs.
    That’s exactly what I was after – a render that looked at least a bit
    realistic. It’s just the little things
    that go an awful long way, and I love having the personal touch. Maybe I just chose the duff companies as it
    really shocked me.

    Anyway – the wife and I went away Fri/Sat/Sun for
    a long weekend away with our friends – booked a couple of log cabins next to each other,
    completely off grid (no tv, no phone reception, no electricity (well, really poor solar), completley off grid – we lived next to
    the fire-pit, cooked everything on a BBQ and drank ourselves warm. As great as it was - even better without the kids -
    coming home, and walking into our house into our new kitchen really was a
    fantastic feeling and it was like seeing it new all over again. It looked even better IMO.

  • Carolina
    7 years ago
    I really enjoyed reading this thread :-) Very high entertainment factor. And you have the cutest apprentice. Kitchen looks lovely, I really like the curves and the shelves you made in the corner.
    Tim Summers thanked Carolina
  • Tim Summers
    Original Author
    7 years ago
    last modified: 7 years ago

    Well, the chippies van was up the drive when I got home from work - a little unexpected. At first I thought that he was sleeping with the Mrs, but then I remembered that he needed to finish the skirting boards.

    He's done a cracking job - quite a few tricky internal/external corners, plus the corners not being exactly 90 degrees he was back and forth to his saw all the time. He really did a stirling job. It was 13 meters of skirting in total - which took him 4.5 hours in total (over 2 evenings) and it cost me £90. Considering I was origionally going to do it, it could well be the best £90 I've spent on this whole kitchen.

    I need to get a lick of paint inside the alcove that's pictured. Our little fishtank will be returning in there, but as it's out I may as well do it.

    When we get the bar stools, and dining room table & chairs I will update again.

    So: What would I change/add/remove

    1. ADD - Somewhere to hang the tea-towels. We have some on the inside of a cuboard, but they keep falling off. Maybe I need some slightly more expensive 'hangers'. The space where they could have gone we put a spice rack/draw thingie - that's probably better though.
    2. ADD - We forgot about the bin! Now we have our pedal-bin basically kicking around the kitchen. The Mrs has already filled the cupboards to maximum capacity so I'm having trouble getting an internal cupboard one past her. I think I may just fit one then deal with her later. The bin has gravitated to a semi-perminant place, but with the kids trying to be *cough* helpfull the wall is already beginning to get the odd splatter of 'stuff' where they just throw their food in the general direction of it.

    Last night I said 'Well, why don't we just put it in the utility room' - She shot that idea down instantly as she obviously isn't happy about the extra 4 steps that it would take to walk all-that-way into another room. Poor thing! Typical woman lol.

    1. ADD - At the start of the project I would have got the electricians to chase in another mains wire from the fusebox so that it comes out of the kitchen wall centrally to the back garden, then I would put a PIR Security Light in. I know that it's not a big job by any means, and I could, and probably will, do it myself over the coming weeks but if I could have had it without a wire on the outside of the house then that'd would have been perfect. Also, thinking about it, I would have actually got him to do it at the front of the house as well as he re-wired the whole downstairs with new fusebox etc.
  • proctorlouise71
    7 years ago
    Useful to know about the the outside lights. Thanks
  • Daisy England
    7 years ago
    It's amazing how many people never consider a towel rail and where they're going to put a bin.

    I've seen kitchens with towels thrown in a heap on the worktops and also put over the oven handle.

    I'd definitely try to find a place for your bin. It's essential in the kitchen and needs to be convenient.
  • Karen Davis
    5 years ago

    I know this is an old thread but love your skirting boards. Where did you get them and what is the shape called please?


  • Tim Summers
    Original Author
    5 years ago

    Hi Karen, I bought them from Wickes and the style is Torus. From memory I think that they are the 18cm tall ones


    Actually, these are the ones: Wickes Torus Fully Finished MDF Skirting

  • Tim Summers
    Original Author
    last year

    I thought I'd resurrect this old thread rather than starting another, because essentially this could be included on this.


    We've decided that it's time for a kitchen refresh (repainted in different colours, new dining table & chairs, new kitchen tap, new accessories.


    So, here we go ..............


    The end wall of the kitchen is now being turned into I guess a 'feature wall' - very 2000's I know, but I think that it'll work. We've got BOLD ........ go big or go home is my mantra lol


    Decided on Charlotte's Locks from Farrow and Ball for this ( F&B Charlotte's Locks ). For the first time ever I also purchased whatever undercoat was recommended by F&B - I'll let you know if I think that it's worth it. Probably not, but hey.


    This is last night after two undercoats, plus one top coat. The second and final coat will go on tonight. The first couple are quite bright as I was using my daylight lamp to see.


    and this morning in a different, drizzle rainy light.


    * notice that we've decided to paint all the way down to the floor incl. the skirting boards. We'll overpaint if we don't like, but personally I think that it looks pretty good.


    Yes, it's currently just a big slab of bold colour, but we've got a lovely big piece of art with a heavy black frame to go, plus table and chairs. ( Painting )


    Also we've ordered a couple of 'statement' chairs which I think will go LOVELY !!! ( Set of 2 Amy Chairs ) These at either end of the new table


    The other 3 walls, and the ceiling will be painted in F&B strong white (it's not actually white, it's just a really really pale neutral) F&B Strong White


    I've got some orange metro tile samples on the way for some idea that I'm thinking through, it may not come to fruition, so I'll update maybe if it happens.


    That's about it for today. I'll keep updating as/when something interesting happens.


    Comments, Ideas etc more than welcome


  • Sonia
    last year

    The orange has a real 60s vibe and I can’t wait to see it finished. The chairs you have chosen are also of that era in style so a really good choice. That painting is stunning. Well done.

  • Tim Summers
    Original Author
    last year

    Everything seems to be taking shape - we need to put another coat of paint on one half of the ceiling then that's pretty much all of the painting completed. I won't bother to post a picture quite yet as I need to change out all of the sockets etc. but this weekend I'm planning on tiling a little alcove bit, just to run the colour through the kitchen.


    This is the alcove:


    and I've gotten hold of some retro vintage orange metro tiles that were delivered yesterday.


    I am planning on tiling in a 45 degree herringbone pattern, I laid the tiles out last night and I think that it's going to look great.


    So I'll tile both sides and the back.


    I've done some odd bits of tiling before, but only using standard cheap rectangular ones, so this is going to push my DIY skills a little further, but weirdly enough I'm super looking forward to it.


    I've not bought the grout yet - standard white? Cream? Black? Something else?


    What do you think ?


    Oh, and at the top of the alcove, around about the light switch height, there is a light fitting, so I'm thinking of going with one of those LED vintage filament bulbs that look slightly orange/gold anyway to light the whole area up with a background orange glow. Yay or nay ?


    Thanks

  • Tim Summers
    Original Author
    last year

    Finally completed my tiling 'experience' - messy old job but acutally pretty enjoyable once I'd gotten into the swing of things.


  • Tim Summers
    Original Author
    last year

    Still pressing on with the kitchen refresh. We had both the sets of chairs delivered yesterday which was a big step forward, just waiting for delivery of the bench to go across the back wall. I need to finish the electrics, and change out a few picture frames etc, but we're nearly there.


United Kingdom
Tailor my experience with cookies

Houzz uses cookies and similar technologies to personalise my experience, serve me relevant content, and improve Houzz products and services. By clicking ‘Accept’ I agree to this, as further described in the Houzz Cookie Policy. I can reject non-essential cookies by clicking ‘Manage Preferences’.