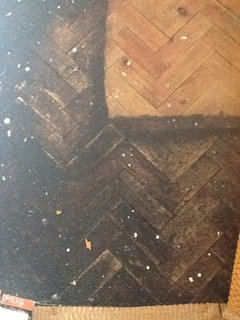
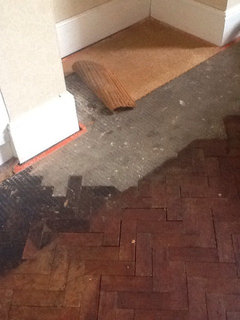
Parquet floor disaster? Help
jessegee
10 years ago

Featured Answer
Comments (166)

jessegee
10 years agolast modified: 10 years agoRelated Discussions
Which direction should I lay parquet floor
Comments (34)Taken me sometime as just wanted to exhale and enjoy the moment. Very long post sorry. Preparation Research the job - there are loads of videos on You Tube of what to do and how best to do it; I somewhat took the best from all. Buy more than needed as it's easier to take excess back rather than fall short. Blocks 1. Blocks no longer need to have all the bitumen taken off. There are now adhesives that can do the job without all the scraping. I found companies that could take all the bitumen off but it would have cost a tidy sum. I used Lecol 5500. But the sides and tongues still needed to be cleaned in order to get a good fit. 2. If the tongues are damaged the blocks can still be used. You could actually take them all off and still have a good finish. I wasn't going to do that to close to 3000 blocks. Again, I found companies that would do this. 3. Spend some time grading the blocks - size, height, wear, complete (tongue). It really does help when laying, and therefore sanding and the finish, as you then don't have huge amounts to level out. Surface 1. Ensure you have a sound subfloor. Luckily I already had one but had to still take it up as I put some sound proofing down under. 2. Make sure level with no screw heads locking out and no squeaks as the last thing you want is to lay it and the floor squeaks all about. Laying 1. Measure, check and double check. Including borders and expansion gap. 2. As shown in the videos lay a crown line: The centre of the room is the backbone of the whole floor, it ensure rows are straight going forward. 3. Start early, especially if you think you can do it in one day. I took a week, doing some everyday after work. But this helped as the previous rows were then hard and didn't move. The adhesive will be a bit slippy and moveable until it's dry so don't walk on it. 4. Lay each row 'dry' to ensure that they will sit together before applying the adhesive. It takes longer and maybe a little messy ( adhesive overlay ) but worth it. 5. For the border, overlay where you've measured where the border should be (making sure not to add adhesive over your marking ) and then use the saw to take off the excess. As it wouldn't have had the adhesive on it'll come up super easy and leave with a clean finish. Sanding, Filling and finishing. 1. If sanding yourself find a firm that has a Trio and belt sander. Absolutely brilliant machines. As they have three rotational disks perfect for parquet as difficult to sand along the grain with belt sander. I used the belt first until the 60 paper grade and then switched to the Trio. 2. Use 60 or 80 dust mixed with resin for filling. Again loads of videos on the Tube. I used Lecol 7500 resin. I filled it twice sanding in between. 3. Research the finish you want and if not sure take an example to a wood flooring specialist to get their advice....See MoreLeaking shower disaster -help
Comments (6)Hi there, sorry to hear about the problems you've had. Ashton's have given good advice, and the flex-seals are a good option to reduce your risks of leaks further. I too would be interested to know what tray you used? The quality of trays can vary hugely, and over the years we've narrowed down what we use to a few suppliers we trust. It is not until you come to fit or, indeed, still later that you find that "bargain" was actually an expensive mistake. I'd echo mayfly's advice too - by splitting all the elements of your bathroom (different products from different suppliers, different builders/tilers etc), you leave yourself open to escalating problems with everyone blaming everyone else. If you go to a single independent, they'll put together a package based on products and tradesmen they trust, and if anything goes wrong you only have to deal with one company, and they'll normally move heaven and earth to fix it. And their tradesmen & suppliers will move heaven and earth to sort it too - they won't want to risk losing all that repeat trade where they might walk away from a single difficult job. It might look as though the up front price is a little higher than doing it all yourself, but when things go awry you may find it is a false economy. I hope you get the problem sorted and good luck with the kitchen too!...See MoreHelp - Parquet Wooden Floor and Underfloor Heating Kitchen
Comments (3)Hi Emily, Wood flooring in the kitchen is perfectly fine. You can opt for a varnished floor that require no special maintenance apart from adequate cleaning, or an oiled floor that do require regular oiling but that is also easier to repair or re-sand. underfloor heating is not a problem either and although wood is an excellent insulator (unlike ceramic tiles) the heat from the underfloor heating will make your wood floor warm and comfortable. However, always remember that with underfloor heating you need to keep en eye on air and floor temperature and air humidity. Too dry (which is often the case with underfloor heating) and gapping between floorboards can appear. Too humid and the floor may "cup". Fell free to get in touch if you need more info. All the best....See MoreOak Flooring Disaster - What Now?
Comments (12)Hello, sorry to hear about your experience. I'm not a floor expert but wanted to share my experience and thoughts. If you plan to screed the floor again, it might be wise to research how long the screed really takes to dry before laying a wooden floor because even though it is dry to walk on, there may still be moisture in the screed. If you lay the DPM, then add screed on top, the moisture only has one way to go which is upwards into the wood floor again. Why do you need the self levelling screed? Is it because the floor is completely unlevel in one part of the room compared to another? Just from my own experience, I've just had my kitchen, hallway and extension installed with engineered floors back in October. We had a chimney breast removed and this chimney sat on a concrete floor, the rest of the floor had wood floor joists. As some of the concrete floor was disturbed during the building work, the builder said he was going to fix it by filling the gap with concrete but lay DPM in the between the joists so the damp would not go through to the joists. When the floor fitter came to check the site, I told him this was the plan for the area, he immediately said the floor would not be dry in time ( floor to be installed a week after the concrete ) and said he would not install the wood floor in that area as it would take months to dry and the moisture would go into the wood. The existing concrete also had some damp ( not sure if this is normal ), he used a damp meter. The builder was obviously not happy with this as he said it takes 2 days to dry and there was a bit of standoff off between the fitter and the builder. The floor fitter said yes it might take 2 days to dry to walk on but moisture is still in the concrete. Eventually I had to get the builder to remove the concrete floor section and replace it with joist. In this situation I decided to trust the floor fitter as this was his field of expertise. My point is, even if you have a screed, I think you also need some DPM or something in between the screed and the wood that stops the moisture from rising into the wood. You could also go to some independent flooring shops if you still need to look for new flooring as they are usually very knowledgable, explain your situation with the screed, tiles etc and they would should be able to advise you what to do to avoid the same thing happening again. Did you have the floorboards floating or glued?...See More
mefor
10 years ago
sunnie2day
10 years agolast modified: 10 years ago PRO
PROAl Fortunato Furnituremaker
10 years agolast modified: 10 years agojessegee thanked Al Fortunato Furnituremakerjessegee
10 years agolast modified: 10 years agojessegee
10 years agojessegee
10 years agosunnie2day
10 years agolast modified: 10 years agojessegee
10 years agolast modified: 10 years agojessegee
10 years agojessegee
10 years agojessegee
10 years agolast modified: 10 years agojessegee
10 years ago
User
10 years agojessegee
10 years agopdk920
8 years agoEmmanuelle
8 years ago
Karen Shemwell
8 years agojessegee
8 years agoUser
8 years ago
maria galvano
8 years agojessegee
8 years ago
jools44
8 years agojessegee
8 years agolast modified: 8 years agojools44
8 years agoKaren Shemwell
8 years agojessegee
8 years agolast modified: 8 years agojools44
8 years agojools44
8 years agoHopefully Helpful
8 years agocalwadd
8 years agojessegee
8 years ago
Matt
8 years agojessegee
7 years ago PRO
PROWhite Red Architects
7 years agojessegee
7 years ago


sbrustein