Renovating

A Beginner’s Guide to Installing Wall Panelling
Transforming your home with wall panels is actually more achievable than you might think. Read on for expert advice

Wall panelling is a fantastic feature to use in the home and the variety of styles and finishes means it works in almost any interior scheme. Here are some top tips and expert advice on choosing and fitting the perfect panelling for your home.
Choose your style
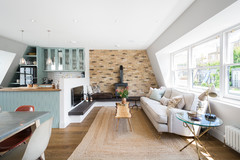
The kind of panelling you go for will have a significant impact on the room, so think about the style of your interior, as well as the architectural period of the building. Victorian or Georgian panelling will look perfectly at home in traditional properties with ornate features and mouldings, like this one. For a classic look with cleaner lines, you could opt for Shaker panelling instead.
Panels should be spaced evenly apart, and the width will depend on the total length of the wall to create a uniform effect. Paul Gamble of The Wall Panelling Company says, “Aim for a benchmark width of 600mm.”
Similar to Shaker panelling, tongue-and-groove planks create a classic look that works in both traditional and contemporary spaces. This style is ideal for bathrooms, as it features no horizontal edges on which water might collect, which could damage the wood.
Alternatively, flat-plank wall cladding or panels are often seen in rustic finishes for industrial, Scandinavian or shabby chic designs. The beauty of flat planks is they’re much easier to use, with few calculations and simple fixing options. You can also apply them horizontally, vertically or on an angle.
Keith Bolshaw from mywoodwall, which produces self-adhesive wood panels, advises, “Decide on your pattern or configuration first, whether it’s horizontal rows, vertical columns or a staggered look. You can combine the two in a basket-weave effect, or go diagonal for a herringbone pattern.”
Explore materials and finishes
Paul Gamble says, “Most people choose a painted finish for their panelling. He recommends “a quality, moisture-resistant MDF for the panel rails and backing board”.
Using a painted finish gives you a lot more freedom, as you can transform the look dramatically with colour. Tone the panels in with the walls for a subtle look or go bold with a contrasting shade. In addition, alternative materials are more versatile and practical, allowing you to install panelling in high-moisture areas, such as bathrooms.
Of course, natural wood panelling is still a beautiful option. The exquisite oak panelling in this entrance hall demonstrates how floor-to-ceiling timber can still look light and airy.
Decide on height
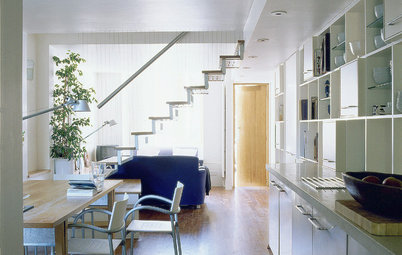
Your next job is to decide how high you’d like your panelling to go. Many people opt for dado height, as these homeowners have done. Paul Gamble says, “Dado height is usually one metre from the floor, especially in hallways and next to staircases”.
This is also a good height for bathrooms, as it should clear fixtures and fittings, such as the basin or toilet cistern.
Another option is to go from floor to ceiling for a dramatic look. Alternatively, you could take it up high but not all the way. Consider other elements in the room, such as architectural features, fitted joinery furniture or windows and doors.
As a general rule, thirds are more aesthetically pleasing to the eye, so if you’re looking for an even ratio, try dividing the wall into a third or two thirds, rather than in half.
Measure up your walls
Now you know exactly where the panelling is going to go, then you or your builder or carpenter can measure how much you’ll need.
The method for measuring will depend on what type of panelling you’re going for and how it’s sold. If it’s simply a square meterage, then work it out as you would with tiling: divide the area into rectangular sections, calculate the dimensions of each section, then add them together and tag on 10% for wastage.
If you’re ordering lengths of planks, such as tongue-and-groove, take the linear measurement along the walls to be panelled and divide by the width of the board. Again, make sure you add a bit extra to the order for wastage.
Think about the extras
Before you place that order, have a think about the additional products you might like to finish off the look. Most companies will offer dado rails to complement their panelling that you can fit on top to finish off the edge.
It’s a good idea to order your rail from the same company, as it will be designed to fit your panels. There’s a little notch at the back that fits over the top of the panel and conceals the edge, which is helpful for straightening up wonky edges.
A shelf is another way to finish the top edge, by either closing off the open top when boxing in services (more on that below), or simply by fixing it onto brackets fitted to the front of the panelling.
Many skirting boards feature a flat edge on which you can rest your wall panel. Otherwise, you may wish to fix your skirting board to the front of the panelling.
Allow for plumbing and electrics
Wall panelling is a useful and attractive way to conceal services such as pipework and toilet cisterns. Your builder should ensure there’s sufficient space behind the panelling and construct the frame using studwork and possibly an additional substrate, such as plywood or MDF, depending on the type of panelling. There should also be an access panel for servicing and maintenance in the future.
If there’s a radiator where your wall panelling is going to go, discuss how this might be dealt with. Panelling can be cut from the bottom to allow you to slide it over the brackets of an existing radiator. Alternatively, if the radiator hasn’t been fitted or you choose to remove then reinstall it, you can fix the brackets directly onto the panelling.
Similarly, your builder needs to take note of where your sockets, switches and wall lights are, and how they will fit within the panelling. It looks much better if these don’t interfere with joins or panel edges, so they may need to be moved to accommodate the layout.
Check the condition of the wall
As I mentioned earlier, wall panels are a great way to conceal uneven or unattractive surfaces. If your wall is very uneven, your builder may need to install wooden battens to the area.
Depending on the method of fixing, an additional substrate layer of plywood or MDF can be fixed to the battens to provide a smooth, flat surface to work with. This is called dry lining.
Also check for damp, blown plaster (which is when the plaster is loose and coming away from the walls) or any flaking on the surface. “Check the surface for any flakiness or damp first,” advises Keith Bolshaw. “This will need to be dealt with before anything else, or your panels might fall off the wall or rot. Even sealed, treated wood will succumb to perpetual damp eventually!”
Fix your panels
There are a number of different ways panelling can be fixed to walls, and it mostly depends on the style of panelling you’re using.
The most popular and common method is to use glue, with the panels held with pins while it dries.
Paul Gamble says, “Panel rails should be filled and sanded with a two-part filler before you fit your panel moulding, as it makes the task so much easier.”
Tongue-and-groove panels can be fixed directly to wooden battens without glue, so you don’t need to dry-line. Pins are hammered through the ‘tongue’ part of each panel, which is then concealed by the next plank.
Flat planks can also be installed with glue, or nails can be used and left exposed for a rustic look.
Paint your panelling
Once your beautiful panelling has been fitted, with holes and gaps filled, and the glue all dry, simply choose your perfect paint colour.
Tell us…
Would you consider fitting wall panelling? Let us know in the Comments section.
Once your beautiful panelling has been fitted, with holes and gaps filled, and the glue all dry, simply choose your perfect paint colour.
Tell us…
Would you consider fitting wall panelling? Let us know in the Comments section.


Sponsored

Sponsored
There are so many reasons to fit wall panelling in your home. As well as looking beautiful, it has several practical features. It can be used to conceal uneven or unattractive surfaces, and provides a durable wall covering in high-traffic areas, such as hallways and staircases.
Panelling can also incorporate a useful shelf or handrail, and is a more attractive way of boxing in services, such as plumbing and electrics. It can also be used as an alternative to tiles in bathrooms and kitchens, although it wouldn’t be as waterproof.
Find the perfect person to help with your project in the Houzz Professionals Directory.