

Don’t Forget This Key Ingredient When Planning a Tiled Area
Gearing up for a tiling project? Don’t get busy until you’ve read this essential beginner’s guide to grouting

Like many unsung heroes, grout – the sealant between tiles – tends to gets overlooked. It may not be glamorous, but it’s powerful: it can be the difference between a damp-damaged bathroom or kitchen and a room that’s usable long-term.
And there’s more to grout than you might think, especially as new colours and materials come onto the market. Use our quick tips to choose the right grout for your space.
Professional advice from: Connor Dow of European Heritage; Lee Thornley of Bert & May
And there’s more to grout than you might think, especially as new colours and materials come onto the market. Use our quick tips to choose the right grout for your space.
Professional advice from: Connor Dow of European Heritage; Lee Thornley of Bert & May
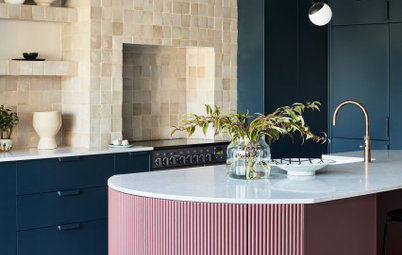
Consider colour
“There’s now a wide range of different-coloured grouts on the market,” says Thornley, “and while black and darker shades have grown in popularity in recent years, we’re also now seeing more varied tones coming through – even pink and green shades.”
Which colour grout you choose depends on your vision for the space. You can blend the grout colour with the tile to create a seamless finish, or contrast it to make your tiles to stand out.
“If you’ve chosen white metro tiles for your shower walls and dark grey tiles for the floor, perhaps a grey grout would accentuate the colour scheme,” suggests Connor Dow of European Heritage. “A close colour match would suit a contemporary, concrete-effect tile where you don’t want to notice the grout as a feature.”
Choose the right material
Cement-based grout is the most common type. It’s porous, but usually water- and stain-resistant, although you may want to use a grout sealant as well to stop discolouration.
Epoxy resin grouts offer higher performance. “They’re incredibly flexible, stain-resistant and waterproof,” says Dow. “This comes at a cost, so they’re typically used in showers or on splashbacks, where the moisture content is high but the area is small.”
Select your tools
You’ll need to wait until the tiles have been fixed and their adhesive has completely cured and dried before you can grout. This means it can bond to the adhesive beneath as well as the tiles themselves.
“To apply the grout, you’ll need a grout float,” explains Dow. “There are two types: one for walls and one for floors. The float has a rubberised pad on the face, which is specifically designed to help spread the grout into the joints.
“The grout mixture should be pressed into the joints with the float,” Dow continues. “Make long, upward, diagonal strokes and ensure you work the mixture deep into the joints. Moving the grout float diagonally ensures a smooth movement across a larger area.”
Is it over for metro tiles?
Finesse the finish
Once you’ve started, aim to operate quickly, as the grout mixture will begin to harden, making it more difficult to apply.
You can wrap up the job by using a finishing tool to shape the grout lines uniformly. Insert the nose into the surface of the grout and pull it along the joints in one smooth, continuous movement for the best finish.
Have you experimented with coloured grout? Tell us in the Comments section – or just share your own grouting tips.


Sponsored
Grout adds to the overall performance of your walls. “It fills the voids between tiles. This creates a stronger bond between tile and surface, providing more durability as well as helping to stop water ingress and prevent water damage,” explains Lee Thornley of Bert & May.
There’s an aesthetic benefit, too. “Not only does grouting help align patterns and achieve a clean, uniform look, it can also contribute to a room’s colour scheme,” Thornley adds.
Discover 7 budget-friendly ways to ace an Ikea kitchen