cloppy

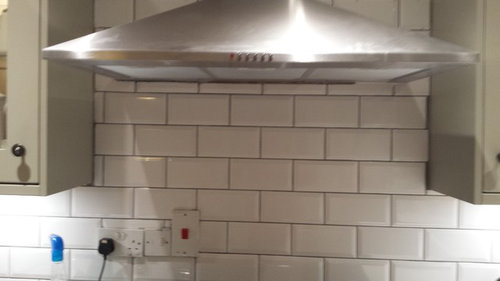
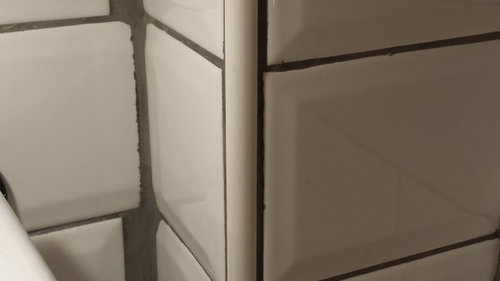
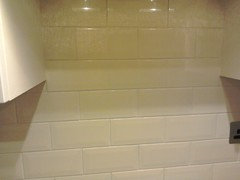
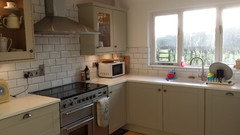
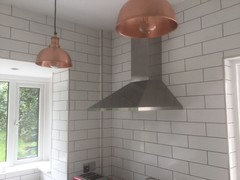
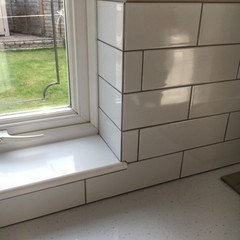
Problem with metro tile with grey grout in kitchen

cloppy
8 years ago

We've nearly finished our new kitchen but are running into a few problems with the tiling, which is white metro tiles with grey grout:

1. We made the mistake of installing our cabinets and extractor fan before tiling - so the effect of the brick tiles going behind the chimney/cabinets isn't working. The tradesman (builder, not tiler) is trying to tile around the obstacles and it doesn't look right. I either have to ask him to take down the extractor and re-install it, or accept that it looks ugly and chip away the top section and only tile up to the bottom of the fan (which is a shame as it's a nice design feature).

I think tiling up to the bottom of the cabinets is our only option as it just looks really messy cutting around the cabinets.

2. No idea why but the metro tile isn't cutting neatly - it's chipping a bit. The grey grout is then bleeding into it slightly and looking a bit messy on the cut tiles. The tiles are very cheap - not sure if this is the problem? (£14.95 per sq m). Or the builder's tools?

3. There are a couple of sections where there is a thicker line of grey grout due to the space being too small to add a cut tile - my eye is drawn to these areas (you can see 2 egs on right of below pic). Would it be worth painting them or adding white grout?? No idea how to solve this!

I fear I should have got a tile specialist in - parts of it have been done well, there are just problematic areas. It wasn't an easy job and it was my error not telling the builder to install the fan after (we hadn't actually decided on tiles when started kitchen).

Any advice very welcome. Regretting choosing a dark grey grout - it shows up so much more!

Above - you can see where the tiles have been cut out around hood - on left (directly under hood) we've added grey grout and on right white to see which is the least noticeable. I think the white and then need to draw in grey bits? Not sure what product we'd use? Or would that be naff?

Eg of messy corner area.


Comments (29)

  • Jennifer Jackson
    8 years ago

    Sorry for the unhelpful advice, but just wanted to say I personally think it looks great, we did the same thing, didn't choose tiles until after the kitchen was in. We didn't tile around the chimney though, just up to the line below it so probably would have had the same issue as you had we tiled right up.. We were going to do the same colour scheme as you but at last minute chose the opposite colours, grey tiles with white grout.


    cloppy thanked Jennifer Jackson
  • cloppy
    Original Author
    8 years ago

    Yours looks gorgeous - I love the grey tile with white, works really nicely. So pleased you like ours - maybe I'm being too fussy. It's difficult to stand back sometimes and see the bigger picture, isn't it!

  • Related Discussions

    What shade of grey grouting with white flat retro metro tiles?
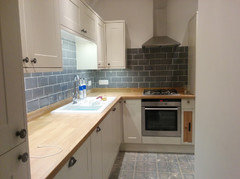
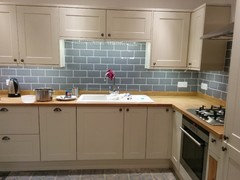
    Q

    Comments (6)
    Hello allyallyally3, I think it depends how much contrast you want to show.. I don't think it will make anything look closer but the darker the more pronounced the aesthetic.. I quite like the dark and I think it looks really stylish.. (don't take notice that they are kitchen image- just to show the grout and how light or dark can look quite different.. Either way I think it's really nice! : ))
    ...See More

    Grey grout for white metro tiles

    Q

    Comments (3)
    Hello Carol, What about a darker grey. Mapei have a good selection.. I think if you want to make a statement with coloured grout as it's gr8 for subway tiles, from my experience I would suggest darker.. Light is not anywhere near as interesting.. but that's because I'm sitting here looking at mine! : ))
    ...See More

    POLL: Metro tiles - hit or miss?

    Q

    Comments (56)
    I used white ones with white grout as splash back around hob and just up to window height around the rest of the kitchen. They were inexpensive and look quite stylish and unobtrusive. I would never opt for coloured or patterned tiles as they would inevitably date and tiling is SO permanent. I do however hate them with dark grout.
    ...See More

    White Metro Tiles With Grey or White Grout?

    Q

    Comments (9)
    It comes down to personal taste doesn’t it? I prefer white tile with white grout as I think the grey grout has a grubbiness about it, rather like public toilets in the 1960’s and 70’s. Obviously if you are relatively young then you will not have this wonderful memory lol!
    ...See More
  • Jennifer Jackson
    8 years ago

    Thank you :) took longer than it should have to decide, in the end I just gave up and took the leap and am so glad I did! Also I had a better look at some of our tiling and its like yours in places too, with the thicker grout. Now I see it, I'll probably notice it, but once the kitchen is finished I'm sure neither of us will notice any of the flaws :)

    cloppy thanked Jennifer Jackson
  • PRO
    Pat Oliver Interior Design
    8 years ago
    last modified: 8 years ago

    Hi Cloppy,

    Your first mistake was to not use a professional tiler for your kitchen. So easily done when tiling is one of the last jobs and the money is starting to get tight.

    So, how to rectify the job now? Firmly ask the tradesman who did the tiling to remove the tiles to a full row below the extractor, then move the extractor either up or down so you finish with a full row of tile beneath it- no cuts. Any chipped tiles should be removed and new tiles put in. Then scrape out the grey grout for the entire kitchen and regrout with white. Because the grout is matt and the tiles are glossy, you will still see the tiles stand out, but the heavy grout to the right under the hood will not be so obvious.

    For your next tile project, ask around for tiler recommendations and go see their work. Tiling is not as easy as many people think it is and a good tiler will foresee problems while setting out.

    Don't worry, you can still end up with your dream kitchen.

    cloppy thanked Pat Oliver Interior Design
  • ali270
    8 years ago
    I do feel for you but actually the overall look is okay . I agree the tiling behind the hood is a mess and should be put right by the builder at no extra cost to you , however if you can't achieve that then the quickest , cheapest option would be to put white plastic quadrant beading down the side of the cabinets to hide the unsightly grout . Not the ideal , aesthetic solution , but less eye catching than the grout . I hope you find a solution you can live with .
    cloppy thanked ali270
  • PRO
    Re:Design Architecture
    8 years ago
    Agree with Previous comments in the thread. The tiling should have been coursed and end at the extractor with a full tiles. However I'm quite impressed he's managed to such a large portion of the top tile. At the same time, the gap difference to the wall units is not helping the visual aesthetics. If nothing can be done apart from redoing the tiles, I would possibly consider using a trim beads to the extractor and sides of the wall units
    cloppy thanked Re:Design Architecture
  • cloppy
    Original Author
    8 years ago

    Thanks for all your comments and very useful advice. The builder is working on the floor now, allowing me some time to figure out a solution. He is disappointed with the job too and wants to make it right. But I don't think he has the skills or finesse - attention to detail is really key with the grey grout.

    I should definitely have got a proper tiler in but was swayed by his confidence. He has sought advice on the chipping glaze and picked up a tool which is definitely giving a better finish - but still not perfect.

    In the meantime, I'm getting a quote from a recommended local tiler!

    Fortunately the tiles are really cheap.

    The extractor fan isn't functioning so awaiting whether this needs to come down - if so, we can tile behind. But if it can stay up - I guess the cheapest solution is to start the tiling under the hood as you've suggested, rather than attempt to get the look of the bricks going up behind the fan. Such a shame as it's a nice design feature but not worth doing if it isn't properly executed.

    Fortunately our builder seems to be a nice, reasonable man so I'm hoping the solution, when decided, doesn't cause too much conflict.

    Really appreciate your time. What a great resource this is - wish I'd started using it sooner!


  • LTS
    8 years ago
    I hope you can sort it out. We have flat white metro tiles with grey grout in our shower.mLove it.

    The kitchen is looking lovely...any chance of more pics? Where did you buy it from from? :)
  • PRO
    Re:Design Architecture
    8 years ago

    sorry i have just seen the close up picture! AAAaahhhh... i wouldnt accept that at all...this needs to be taken out and redone - no other way about it unfortunately. I'm really sorry you've ended up with this finish, BTW those electric sockets and switches are non compliant, effectively illegal, as they are just above the hob area... as you said, the builder seems reasonable which is good but its also you need to approach matters sensitively to see where the cost to make good is factored in and balanced out...where are you based and is the job being overlooked by a professional in any way? or self managed as a soft refurb?

  • Jonathan
    8 years ago
    I agree that the guy tiling should have mapped it all out at the start and centred everything on the middle of the hob.
    I feel that he should have also put the sockets somewhere more discrete.
    I am sorry to say that I would have all the tiles off and move the sockets while I was about it.
    Then I would have it tiled from the bottom of the cabinets down, adding a pelmet when the tiling is complete.
    I like your grey grout I think this is a confident, stylish choice.
    I would have the area above the tiles and around the extractor painted with a wipeable matt paint. I think a similar grey to the grout would be a fantastic backdrop to your cabinets.
  • PRO
    Re:Design Architecture
    8 years ago
    In reality the wall units either side of the extractor should actually end 'against' the extractor rather than there being a gap there.
  • PRO
    Revive Your Space
    8 years ago

    Oh, feeling for you! I tiled my own kitchen a few years ago with metro tiles in a crackle finish in brick-bond... The hardest thing about it was working out where to start tiling to make sure the cuts on both courses worked out well at every place they would be cut - this is especially difficult because of the way the tile depth tapers at the edges and was a complete nightmare!

    That said - you've paid someone to do this, so they should rectify the bad job they've done, not bothering to work that out all the way up the wall. As for cutting the tiles, they should be wet cut with a diamond rotary blade. My tiles had to be sealed both prior to cutting and grouting so wet things (water and grout) didn't bleed into the tile due to the crackle glaze finish.

    If you're starting again with the tiling I would ask for the sockets to be moved at the same time.

  • juliekfn
    8 years ago

    if moving sockets, as they are not even straight, get the 2 on right of pic put in cupboards. learned a lot over years, most important tell workers what to do,then check again. plugs that you don't use for plugging things in Cooker,Emersion Heater,telephone socket can be hidden in cupboard looks much better.

    .

  • annarocks123
    8 years ago
    I agree with every one who said the sockets need to be moved and when they are, they need to be in line with each other, except for the hard line switch which, like juliekfn said, should be in a cupboard. The tiles need to come down, the thick lines are no good, but the grey grouting is lovely. I'm going for a very similar look in my kitchen and if it's any consolation, I probably would have had the same problem if I hadn't read your question as I'm doing it myself! So a big thanks from everyone who now won't have these issues
  • PRO
    Re:Design Architecture
    8 years ago
    Ok... I've been thinking about this quite a bit... Best way for you to overcome this issue in the simplest manner possible (IMHO):

    1. Remove tiles alongside/around the electrical sockets and shift them along to the left to get them out of the safety zone for the hob - min 30cm clearance and 15cm off the worktop. Replace white plastic sockets with chrome to snazz it up a bit.

    2. Remove the 3+ a bit courses below the extractor and adjust them slightly to the left or right to push them tight into one corner and ensure the cut off is also similarly spaced at the other end. Not ideal but the shift of 5-10mm shouldn't be too noticeable.

    3. Remove all tiles behind the hob and replace with either a stainless steel or glazed splashback.

    Hope this helps.
  • Simon R
    8 years ago
    Wouldn't it have been quite easy to remove the hood and wall units so he could do a full tiling job or at least tile to just under them? The unit hooks would still be there so it would have been no problem to re-fit. I think your builder/tiler should have suggested it. I've fitted my own kitchen so kinda know this was possible.
  • iolosdad
    8 years ago

    As a temp measure if money and time I'd tight, ceramic beading on the sides of the wall cabinets or stainless steel beading like dowel glued to give you a straight edge.

    Ditto what the others have said, you need to speak to the builder with what you now know and ask him how he can put it right?

    If tiles are to be removed get the electric points moved, the switches could be hidden away and have under cabinet power sockets?

  • jayboyd
    8 years ago

    Hi there,

    Firstly the sockets need to be minimum 300mm from the side of the hob. It's the same rule for the sink so make sure that's not an issue either, otherwise it cannot be signed off as safe.

    Such a shame because it would have taken half an hour to remove the extractor and tile around the fixing pointsand re-fit once grouted. I bet it took considerably more time to tile around the extractor.

    It's an expensive job to remove all the tiling, so to avoid that cost I agree with the others on here that a white gloss finish quadrant moulding to the back edge of of the cabinets would take your eyes off that aspect of the poor quality tiling job. If you do stick with the tiles as they are, make sure you apply a couple of coats of grout sealer, especially over the hob area. It will stop staining and make it way easier to clean.

    On a plus note, I think the grey grout looks good against the white metro tiles. You wouldn't want white grout over the cooking area.

    Anyway good luck getting it sorted.

  • minnie101
    8 years ago

    I really feel for you. I must admit I am also slightly baffled, surely you can only either line up with your tap or hob and not both although that may be my ignorance! I've got an aga (:(( )in a recess so can't check! This may be a complete bodge job idea (but I assume possible?) but can you move the ŵall cabinet to the left 0.5cm? It looks as if it needs to be lowered fractionally anyway to line up with the tiles? Perhaps also take a pic of the whole kitchen to see if anything else needs to be rectified other than the sockets? Btw the piece under the hood is really not that noticeable and love the contrast of the grout with the tiles

  • Tracy Sidaway
    8 years ago

    My husband managed to tile between our units and he's a complete novice. I'd definitely get the cooker hood ones done again.

  • cloppy
    Original Author
    8 years ago

    Thanks again for all your comments. Particularly helpful to be alerted to socket issue. I took these pics before the builder replaced the sockets with some nice chrome ones. (see new pics) However, he's still got them in the wrong place. Will raise that today.

    He hasn't actually finished the hood area in these pictures - as I stopped him. But also the chimney extractor doesn't seem to be functioning so it needs to come down anyway. This solves this problem and we can tile behind it - although I'm still worried that he's not going to be able to redo the job well enough.

    I've added some more pics with better light. Still finishing the floor and just have to adjust and tweak a few things but (apart from tiling) nearly there!

    The kitchen is Howdens Burford Grey, Pure White Quartz from Master Quartz (not been impressed with this as marking so easily with pans, belt buckles, any kind of grime - but probably shouldn't have chosen white! - anyone else had problems with their quartz?), Paint mainly F&B Wimborne White and Slipper Satin woodwork, engineered oak floor from Howdens.


  • jackydahlhaus
    8 years ago

    Great thread, so much helpful information! We're redoing our kitchen this year and it's good to hear other people's issues in advance in order to be able to avoid them. Hope you get your dream kitchen in the end :)

  • iolosdad
    8 years ago

    We have howdens burford White with framed doors, we chose the solid oak work tops that was in the catalogue - labour of love to keep them looking good and you get neurotic about putting something wet down.

    any consolation our builders were terrible it ended up in court.

    Finally finished the kitchen with fushia pink splash back around the range which wasn't straight forward either because the glass broke and he refused to complete the job.

  • Simon R
    8 years ago
    They do seem to lose interest towards the end don't they. It's a bit pathetic.
  • Kate Howell
    7 years ago
    I can imagine your frustration . Take down the tiles and do it again but pick flat tiles - no beveled edge. The tiles can then be cut correctly to fill any space
  • Liz Walsh
    7 years ago
    @k8howell67 your trim is lovely in your kitchen and loving the copper accessories
  • PRO
    Jmt Tiling
    6 years ago

    Pay for a pro get pro work. Flat mitred subway tile. The work in the photos is not acceptable.

  • Daisy England
    6 years ago
    Old post.
United Kingdom
Tailor my experience with cookies

Houzz uses cookies and similar technologies to personalise my experience, serve me relevant content, and improve Houzz products and services. By clicking ‘Accept’ I agree to this, as further described in the Houzz Cookie Policy. I can reject non-essential cookies by clicking ‘Manage Preferences’.