
The Benefits of Installing a Kitchen Splashback
The kitchen is arguably the most important room of your entire home since it is where you cook your daily meals, spend time with your family and entertain guests. As such, you want it to be an aesthetically pleasing place, but you cannot neglect the practical considerations when designing your kitchen. Ideally, the kitchen should have a design that permits functionality, offers ample storage space and is easy to clean.
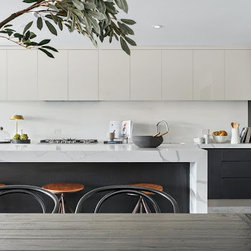
A splashback is one of the most essential features of any kitchen that wants to meet all these requirements. But what exactly is it, and what are the benefits of installing one in your kitchen?
What is a kitchen splashback?
Kitchen splashbacks are countertop extensions that fit the area between it and the upper cabinets. This feature aims to prevent grease, water or any other potentially damaging substance from getting on your walls. A kitchen is a place that sees a lot of wear and tear, as there’s always a risk of something spilling somewhere or of steam affecting surfaces.
If you want to get one for your kitchen, visit Plasticsheetsshop.co.uk and browse the options. There are several different materials available, as well as a plethora of colours to choose from. While some consider getting a splashback completely unnecessary, you’ll realise how important it is after installing it.
Low maintenance
One of the best parts of fitting a splashback into your kitchen is that it makes it significantly more low maintenance. Since the kitchen can get quite messy, you don’t want to be left cleaning every nook and cranny all the time. It’s time-consuming and exhausting, and you have to use harsh cleaning agents that you probably don’t want to have anywhere near the cooking area.
Installing a splashback allows your kitchen to remain tidy. Because it is naturally resistant to bacteria and other organisms, as well as waterproof, you don’t have to worry about spending a long time scrubbing it. Even the peskiest stains can be easily wiped with a damp towel in a few moments.
Part of the décor
You want your kitchen to look nice as well, not merely serve a practical function, which is why you take care of how you remodel the space, the furniture you add and the tiles you use. It can seem like a splashback is a purely utilitarian feature since the fundamental element of the panels is to protect your walls.
Yet, that’s not necessarily true. There are now several types of designs and colours available that you can incorporate into the overall design to elevate the look of your kitchen. It all depends on the look you’re going for. So, for example, if your kitchen has a rather minimalistic look, with clean lines and a neutral colour palette, you can add a contrasting splashback in vibrant shades or even one with a printed design. Use a natural landscape or even a picture of fresh fruits and vegetables that gets you in the mood to get creative with your dishes.
Conversely, if your kitchen is already pretty colourful, with the cabinets, chairs and cupboards in several different shades and tones, choose splashback tiles in charcoal grey or ecru to create a look that’s a bit more sophisticated. Realistically, there are so many options available that you might feel a little bit lost about what you should choose.
Easy fitting
When it comes to remodelling and installing new features in a room, the finished result is generally excellent, but the whole process can be cumbersome. Quite often, something doesn’t go as planned, and you have to start all over again. Luckily, that’s not the case for splashback installation. First of all, because you already know precisely where to install it, the process is more straightforward.
First of all, you need to clean the area thoroughly. After getting the wall spotless, the next step is to apply a silicone-based adhesive to the rear end of the splashback. Ideally, you should use it in equal amounts all over the surface to ensure it sticks well. The panel should be pushed against the wall carefully and as gently as possible. This guarantees you won’t cause any cracks in it and also that it will stick in the correct position and won’t sit askew.
The splashback should be left to dry completely, ideally for twenty-four hours. Yet, you should check a few times during this period. If you notice that the glass seems to move out of place, you should remove it and add more adhesive before placing it back. After the glue has dried completely, you’ll need to seal the edges. Make sure to get all areas to even everything out.
Simple replacement
All items in your kitchen need to be replaced after a while. No matter how well you care for them, the only thing you can do after a certain point is get a new one. Accidents also happen, and your splashback might acquire cracks or dents that affect its overall appearance. Luckily, it is quite simple to replace a single portion of the entire panel without disturbing the whole ensemble. The cracked or damaged tile is removed, and a new one is placed in its stead. This is one of the characteristics making splashback a cost-effective feature to have in your kitchen.
Environmentally friendly
When you’re concerned about the environment and want to lower your carbon footprint, you’re only looking to bring items into your home that don’t have a detrimental effect on the natural world. Splashback tiles are generally made from sustainable materials. The manufacturing process is also not highly extensive, meaning there’s not much fuel and energy going into the production process. If you want to be extra sure, you can always choose tiles made from recycled materials.
There are many important features that make a kitchen great. Luckily, there are ways to blend functionality with aesthetics to enjoy the best of both worlds. So, while a kitchen splashback may not seem necessary, if you want to make cooking and cleaning stress-free, it is more than essential.