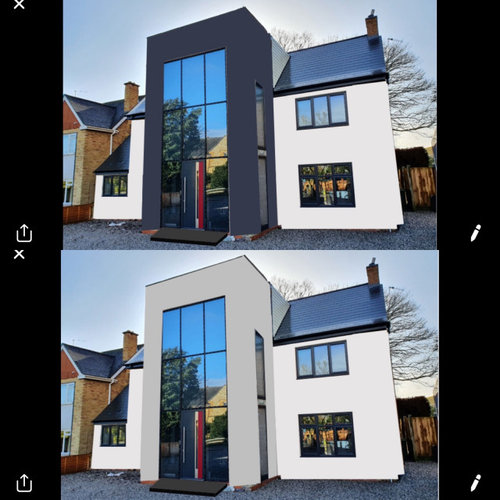
HELP!! Render Colour on renovation project
Fiona Rea
4 years ago
Featured Answer
Sort by:Oldest
Comments (20)

Patrina
4 years ago
Fiona Rea
4 years agoRelated Discussions
Help with render colour please
Comments (20)They are sliding. We deliberated at length. Our architect was always in favoir of sliding. They felt they were more contemporary in look but the main reason was that most of the year they are closed and so we had less panels and less frame with the sliding. I am so glad we went with their advice because we get such a lovely lot of light and connection with the garden with fewer panels and frame. The sliding mechanism works beautifully and there is lots of light. When open they take up no space in the garden. The only downside is on a massively sunny day when you may get the urge to sling doors right back and open like bifold but you have to remember that there is usually then still the width of the stack of doors at the end and for us over our width of opening and with the doors we chose that would have meant 5 bifold doors stacked up. At least when our sliding are open you can still see through the glass of the end panel. Ours slide 2 over one so 2/3 is open. And they can slide to either end. Hope that helps....See More3-bed semi renovation project
Comments (11)@Susan Lacey, this is a live project and it is still incomplete. We wanted to go through the process start to finish, so that readers get an idea of what could be required for their own renovation projects. Therefore, we have not quite reached the "after" photo stage...but we're getting close!...See MoreHow our 3D renders helped this customer!
Comments (0)Many of our customers have the same dilemma... how to visualise the space once completed. With our customer Claire we worked for weeks on designs and layouts for the new kitchen/dining room space until we had it right. We planned on knocking down a few walls and opening and brightening the space whilst adding a gorgeous bespoke kitchen across the center connecting the areas and creating a true heart to what will become a beautiful home. The build is currently still going but we wanted to show you a few before's, the finished renders.. and then let you watch the space come together as we do! Enjoy. This is the property when Claire purchased - it was tired, dark and dated. The L shaped room with current door and window positions made it difficult to fit what the client needed in the space and didn't take adventure of the garden and fantastic views. After weeks of planning and looking at different options the design was agreed and the final 3D images were created to show the client exactly how the space would look - leaving her confident in her decisions on everything from layout to colour. Now the fun could begin! The beautiful new stone floor was laid and instantly gave depth with texture and a brighter more modern feel. New windows and bi-fold doors were added to add light and take advantage of the beautiful views and back garden space. A new door with glass pane leading to the pantry and laundry rooms will add more light from the new windows here too. And then the kitchen arrived really bringing the space to life. We will keep you up to date with the room as it slowly comes to life but please feel free to check out our profile page and see how 3D's can help save hundreds or thousands on your home renovations by allowing you to really visualise the space. Thank you....See MoreRenovating a 1960's 3 bed semi - help with layout and kerb appeal!
Comments (65)Hi all, Thank you so much for all the helpful comments and suggestions, and sorry that it's taken me so long to respond - house renovation and work have been keeping us on our toes! This has become a long post, so a quick reminder - we were looking to renovate and rewire our 60s house to update it and also make it more wheelchair friendly downstairs for when my mother-in-law comes to visit. We employed an architect and came up with what turned out to be an 'aspirational' design (much more than the budget!) so we ended up deciding to split things into two stages: Stage One to add a downstairs wetroom for accessibility, remove chimney throughout and add a porch Stage Two to do the extension across the rear, removing the conservatory to open out a large kitchen/diner and add a utility room The layout below shows both Stages One and Two as complete. Bits shown in red are existing walls which have been/will be removed (apart from the wall in red in the seating area below which is between the existing kitchen and dining room - that's a mistake). So.....the building work is now done - hurray! Stage One is complete, we are much poorer, and we now need to decorate the whole house :-) Some before and after photos below - please bear with the terrible photography skills. The rooms aren't big enough to allow for expansive photos!: We've re-plastered throughout, apart from in the kitchen and upstairs bathroom, as we'll deal with those later. Current challenge is deciding how on earth to pick paint colours and flooring throughout.... Anyway - hopefully that gives you a sense of where we've got to. Best wishes...See MoreFiona Rea
4 years ago
Rowland
3 years agoFiona Rea
3 years agoJed M
3 years agoFiona Rea
3 years ago
Sonia
3 years agoRowland
3 years agoFiona Rea
3 years agoFiona Rea
3 years agoJed M
3 years agoFiona Rea
3 years agoJed M
3 years agoFiona Rea
3 years ago PRO
PROSara Slade Interiors
3 years agoFiona Rea
3 years agorbannister40
3 years agoFiona Rea
3 years ago


Fiona ReaOriginal Author