Renovating
New to Houzz? Here’s How to Create and Use Ideabooks
See how to gather inspiration, share it with others and put your design dreams on the path to reality

A Houzz ideabook is a place where you can store ideas and build dreams. You can save everything you see on Houzz in your ideabooks, including your favourite home design photos, stories, profiles of home service professionals, products, discussions, notes and other details for your home project.
You can also use your Houzz ideabook to communicate with others working on the project. For example, if you’re dreaming of a kitchen redesign, collecting photos of kitchens you like can help you pinpoint the styles, colours and layouts that appeal to you. When you’re ready to start the redesign, you can email your collection to a pro you’re working with to show what you want and start narrowing down your choices. With a simple setting change, you can let others add comments and save ideas and resources, turning your ideabook into a joint project workbook.
Here’s how you can create your own ideabook on Houzz.
Viewing your ideabooks
When you’ve finished adding to your ideabook, you can look at it by clicking Your Ideabooks in the drop-down menu beneath your profile photo at the top of your screen.
When you’ve finished adding to your ideabook, you can look at it by clicking Your Ideabooks in the drop-down menu beneath your profile photo at the top of your screen.
In the web version, your ideabooks page will look like this. Click the title of the ideabook you‘d like to see to open it completely.
Privacy, sharing and collaborating
Once you’ve put the finishing touches on your ideabook, you can share it with friends, family or your home design professional. Click the Invite button underneath your ideabook title, as shown here in the web version.
You can add additional viewers or editors by typing their Houzz username or email address into the search field; you can allow each person to edit or just view the ideabook.
Select the Can View option, for example, to show someone the private ideabook of tile splashbacks you’re considering. Or select Can Edit to give someone the ability to add photos and make comments underneath your own.
After you’ve added your collaborators, click Save Settings. Your collaborators will receive a notification email, so they can help you start making your home design dreams a reality.
You can also make your ideabook private or public. Click “…” next to More in the top-right corner of your ideabook. Click Edit and then drag the toggle next to Make Ideabook Private so the background is green and the circle is on the right side of the toggle. Click Save to update your settings.
Making changes
On the web, you can add new items, delete or email items, and make changes to your notes. Delete or email anything in your ideabook simply by clicking “…” in the upper-right-hand corner of the thumbnail you’d like to remove or send.
On the web, you can add new items, delete or email items, and make changes to your notes. Delete or email anything in your ideabook simply by clicking “…” in the upper-right-hand corner of the thumbnail you’d like to remove or send.
Click Email or Delete in the drop-down menu that appears. You can also save the item into another ideabook by clicking Save.
To add text or notes, place your cursor in the box that says Add Notes that appears when you hover over each photo, and type.
To add text or notes, place your cursor in the box that says Add Notes that appears when you hover over each photo, and type.
On the Houzz app
Saving to your ideabooks
Clockwise from top left, here’s how saving a photo, professional profile, discussion and story might look on the Apple mobile app. The Save button has been highlighted on all four pages.
Saving to your ideabooks
Clockwise from top left, here’s how saving a photo, professional profile, discussion and story might look on the Apple mobile app. The Save button has been highlighted on all four pages.
Viewing your ideabooks
When you’ve finished adding to your ideabook, you can look at it by clicking the Ideabooks folder at the top of your screen.
When you’ve finished adding to your ideabook, you can look at it by clicking the Ideabooks folder at the top of your screen.
In the app, you’ll find yourself on a page like this. To completely open the ideabook you just created or saved a photo to, click the title of the ideabook.
Privacy, sharing and collaborating
Here’s what you might see in the app version. Again, the Invite button, which allows you to collaborate with others, is beneath the ideabook title.
Here’s what you might see in the app version. Again, the Invite button, which allows you to collaborate with others, is beneath the ideabook title.
You can also make your ideabook private or public. Click “…” in the top-right corner of your ideabook. Click Edit and then drag the toggle next to Make Ideabook Private so that the background is green and the circle is on the right side of the toggle. Click Done to update your settings.
Making changes
You can add new items, delete items and make changes to your notes. To delete something in your ideabook, click “…” in the upper-right-hand corner of the thumbnail you’d like to remove.
You can add new items, delete items and make changes to your notes. To delete something in your ideabook, click “…” in the upper-right-hand corner of the thumbnail you’d like to remove.
Then click Delete to remove the item.
To add text or notes, place your cursor in the box that says Add Comment, which appears when you hover over each photo, and type.
To add text or notes, place your cursor in the box that says Add Comment, which appears when you hover over each photo, and type.
Have you used your ideabooks on a recent home improvement project? If so, please share a photo in the Comments section.


Sponsored
Saving photos
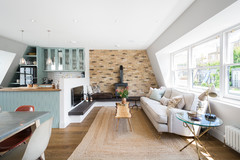
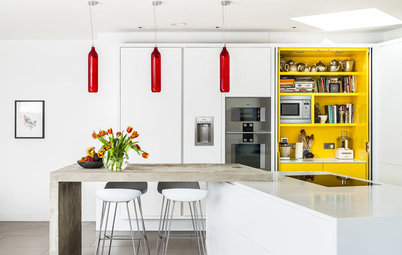
Browse through photos on Houzz. When you find something you like, click the Save button at the bottom of the photo, as shown in this kitchen photo (top left; click on the image to enlarge it).
Saving professionals
When you find a home service professional on Houzz you’d like to save for future reference, click the Save button beneath the pro’s profile photo (top right).
Saving discussions
The Advice section offers a plethora of questions and answers uploaded and continuously updated by the Houzz community. Save a discussion to one of your ideabooks by clicking the Save button beneath the discussion title and its author (bottom right).
Saving stories
Houzz Tours, renovating and decorating guides, and other Houzz stories can also be saved to your ideabooks. To save a Houzz story, click the Save button that appears at the top of the story (bottom left).
After you click the Save button, a new screen will pop up, allowing you to add the photo, professional profile, discussion or story to an existing ideabook. You can also create a new ideabook by clicking the title field, then selecting Create New Ideabook.
You can add a comment about the item you saved at this step by typing it into the field labelled What Do You Like About This Photo? You can also add and edit comments on all items in the ideabook later.
Tip: Consider creating separate ideabooks for different projects or themes. You can create as many as you like.