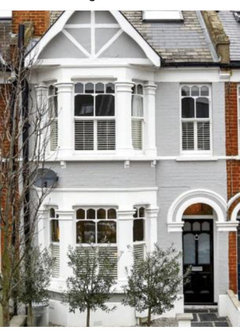
paint colour for max curb appeal
3 months ago

Featured Answer
Sort by:Oldest
Comments (11)
Related Discussions
Help! How to modernise / increase curb appeal on my 1970s dormer house
Comments (16)Hi Stacy. I think weatherboarding will work for the look you're after. Would you paint it all one colour? My only worry was whether it would all be a bit one dimensional and whether the boarding would make the ground floor look lower ( I've drawn it out though and it doesn't seem to make any difference but that could be my lack of drawing skills!) I wonder if you could add a porch with weatherboard like this with either side of the front rendered and painted? The porch doesn't have to be as complex/expensive as this with the steps etc. I've had a similar size ŵall rendered and it was about £150 from memory so the cost would really be for the porch. Can you or your husband draw? It may be an idea to sketch out various options (with colour!) to see what you like then get quotes on the various options http://linleydevelopments.co.uk/portfolio/bungalow-to-a-chalet-style-conversion/#prettyPhoto[portfolio]/1/...See MoreCurb appeal needed!
Comments (7)I would - - Clean the bricks, or paint them white or cream; - Remove the slate from the facade (replace with render if needed); - Remove the plastic bars from inside the windows; - Install a minimalist, dark green or teal front door with a translucent glass side panel; - Plant short, smart trees where you currently have bushes (or rose bushes would look lovely); - Paint the grey concrete patch on the front; - Replace the brick paving and steps with patterned tiles; - Add in some potted plants and phased lighting....See MoreHelp, what colour front door for improved curb appeal ??
Comments (20)Thank you Celerygirl and everyone else. I think I have made my decision now for now. Black !!! I am going to have the door frames, sidelights and door in Black and centralised, the brick work extended at the top of the frame and a roof light installed in the roof. Its exactly what I didn't think I wanted but what sits right with me. Many thanks for all of your help I will update you all with the result in November when we are due to carry out the work....See MoreRenovating a 1960's 3 bed semi - help with layout and kerb appeal!
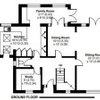
Comments (65)Hi all, Thank you so much for all the helpful comments and suggestions, and sorry that it's taken me so long to respond - house renovation and work have been keeping us on our toes! This has become a long post, so a quick reminder - we were looking to renovate and rewire our 60s house to update it and also make it more wheelchair friendly downstairs for when my mother-in-law comes to visit. We employed an architect and came up with what turned out to be an 'aspirational' design (much more than the budget!) so we ended up deciding to split things into two stages: Stage One to add a downstairs wetroom for accessibility, remove chimney throughout and add a porch Stage Two to do the extension across the rear, removing the conservatory to open out a large kitchen/diner and add a utility room The layout below shows both Stages One and Two as complete. Bits shown in red are existing walls which have been/will be removed (apart from the wall in red in the seating area below which is between the existing kitchen and dining room - that's a mistake). So.....the building work is now done - hurray! Stage One is complete, we are much poorer, and we now need to decorate the whole house :-) Some before and after photos below - please bear with the terrible photography skills. The rooms aren't big enough to allow for expansive photos!: We've re-plastered throughout, apart from in the kitchen and upstairs bathroom, as we'll deal with those later. Current challenge is deciding how on earth to pick paint colours and flooring throughout.... Anyway - hopefully that gives you a sense of where we've got to. Best wishes...See More 3 months ago
 PRO3 months ago


Isla Cherry