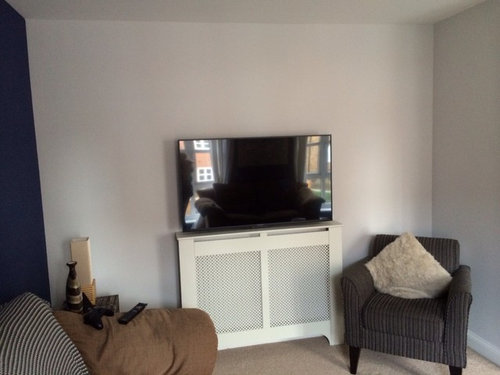
Gallery wall...?
daniellehinves83
8 years ago


Featured Answer
Sort by:Oldest
Comments (6)

jacksplash
8 years agojacksplash
8 years agoRelated Discussions
Frames gallery wall
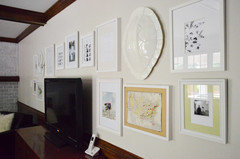
Comments (8)the paper cut out method suggested above is good advice. Consider all landscape, 2 rows of 3. Consider 3 landscape in a column with a portrait flanking on either side. Try to make sure that the subject matter is similar in all the frames -so all black and white photographs of people, or all leaf paintings etc. That gives an elegant and cohesive feel to the group and gives it a reason to be there. Hope that helps...See MoreGallery wall size
Comments (3)I found this guide and a few pics for inspo. I'd suggest laying out a pattern using paper or card of different sizes until you are happy with the look then create your gallery wall....See MoreThe Gallery Wall - how not to mess it up!?
Comments (0)We are often asked about how to display photographs, prints and artwork and it is something people feel very unconfident about undertaking themselves. Our advice? Put aside the temptation to drizzle the house sporadically with frames that lead the eye restlessly from room to room, and go for a gallery wall instead. This statement feature can wake up any space, creating a focal point that draws attention inwards, leaving a lasting impression. PLANNING YOUR CONCEPT Start by planning out a specific concept. From classic collections of fine art in mismatched antique frames, to simple monochrome photographs, there are many different avenues you can take. Finding a singular style that works in your home keeps the wall looking sleek and put together. Use the location to guide your concept for example, an understated cloakroom could use a bright collection of mixed medias, whilst a private bedroom might take a more personal approach. Remember it is called a 'gallery wall' but you do not live in a gallery - sometimes these collections can be just for you and not on public display. Try thinking about the specific style of your home when selecting a way to curate, frame and hang. Keep it in the forefront of your mind throughout the entire process. COLLECTING MATERIALS You may not need go far to source inspiration for materials. To save yourself the expense of purchasing something new, look to use what you already have. Frame those old postcards or magazines you've been saving, dust off those old albums with family photos hidden within, or perhaps find a sneaky way to stylishly integrate your daughter’s ‘contemporary art’ into your collection of modern paintings. Make the wall as minimal or as eclectic as you like, pulling different mediums together to create a variation of texture and depth. When making your final selection, try to limit either the colour palette, medium or style of the pieces chosen to keep the wall looking unified and draw all the separate elements into a singular compelling portfolio. Remember to keep your initial theme in mind, as there is no one set of rules that fits every space. ARRANGING THE GALLERY Once you have your materials collected use the shape of the wall to choose the formation that suits the canvas best – be it a square, rectangle, stair-like zigzag, or an explosion of frames that expand out from the centre. Using the space to guide your arrangement will ensure that the gallery complements the room. Plan out your formation before you begin. Lay the pieces out on the floor first to settle on your shape. Then map out a preliminary design on the wall with something less permanent (we like baking paper!) This allows you to move pieces freely around and experiment with different layouts before committing completely. FIXING IN THE FORMATION To create an asymmetric design that still looks put together, use masking tape and a spirit level to create a base line in the centre of your arrangement. Expand outwards from the line, by adding frames above and below. Keeping the line straight is crucial to a polished finish, so consider enlisting a professional picture-hanger to assist with this part as it can be tricky if DIY isn't your bag. For a circular formation, place a dominant frame in the centre and rotate around the focal point, spiralling outwards. This will create a dynamic swirl that draws the eye inwards. If you wish to avoid the commitment of hanging the pieces, contemplate the flexibility of shelves. Once assembled against the wall, frames can be filed along the shelves. This creates a no-strings attached gallery, as artworks can be interchanged as little or as often as desired. Installing the frames lower than you may have originally anticipated can also help to create more impact. Having the gallery at eye level invites the viewer to consume more of the scene at one time. Consider also the context in which the frames may be viewed. If the frames are creeping up a stair, perhaps stagger them in the same direction as the steps. For a seated position on a sofa, the gallery would be best viewed from a lower level. Curating that final collection can be challenging and time-consuming, so if you feel overwhelmed, do consider enlisting one of our Buddies, who would be more than happy to help. Ask us anything...See Moregallery wall- how does it look?
Comments (19)Thank you all really appreciate your feedback :) I did try put them on the floor beforehand and though it looked really good 🤣 haha. If I went with Jonathan’s layout (which I love!) would I literally have to cover the holes, paint and start again? Or am I missing a trick (other than not covering the holes that the pictures will cover up)? I could add some more underneath but I think I might be adding to the problem with some uneven looking out of place pictures 🤣...See More
jobax9
8 years ago
mrsmcee74
8 years agodaniellehinves83
8 years ago


mrsmcee74